Mike Agranoff
Blog - 2020


December 16, 2020
Last Year I Couldn't Spell "Author". Now I Are One!
Click on image for an enlarged view.
|

As I write these words, I am within a week or two of publishing my first book. Well, not exactly the first. Sometime around 1987, I "published" this book's precursor as a typed up (on an actual typewriter) manuscript, and Xeroxed after working hours on the office copier (using my own paper, mind you) in quantities of a dozen or so copies at a time, to be sold at gigs. But this one is official with its own registered copyright and ISBN number.
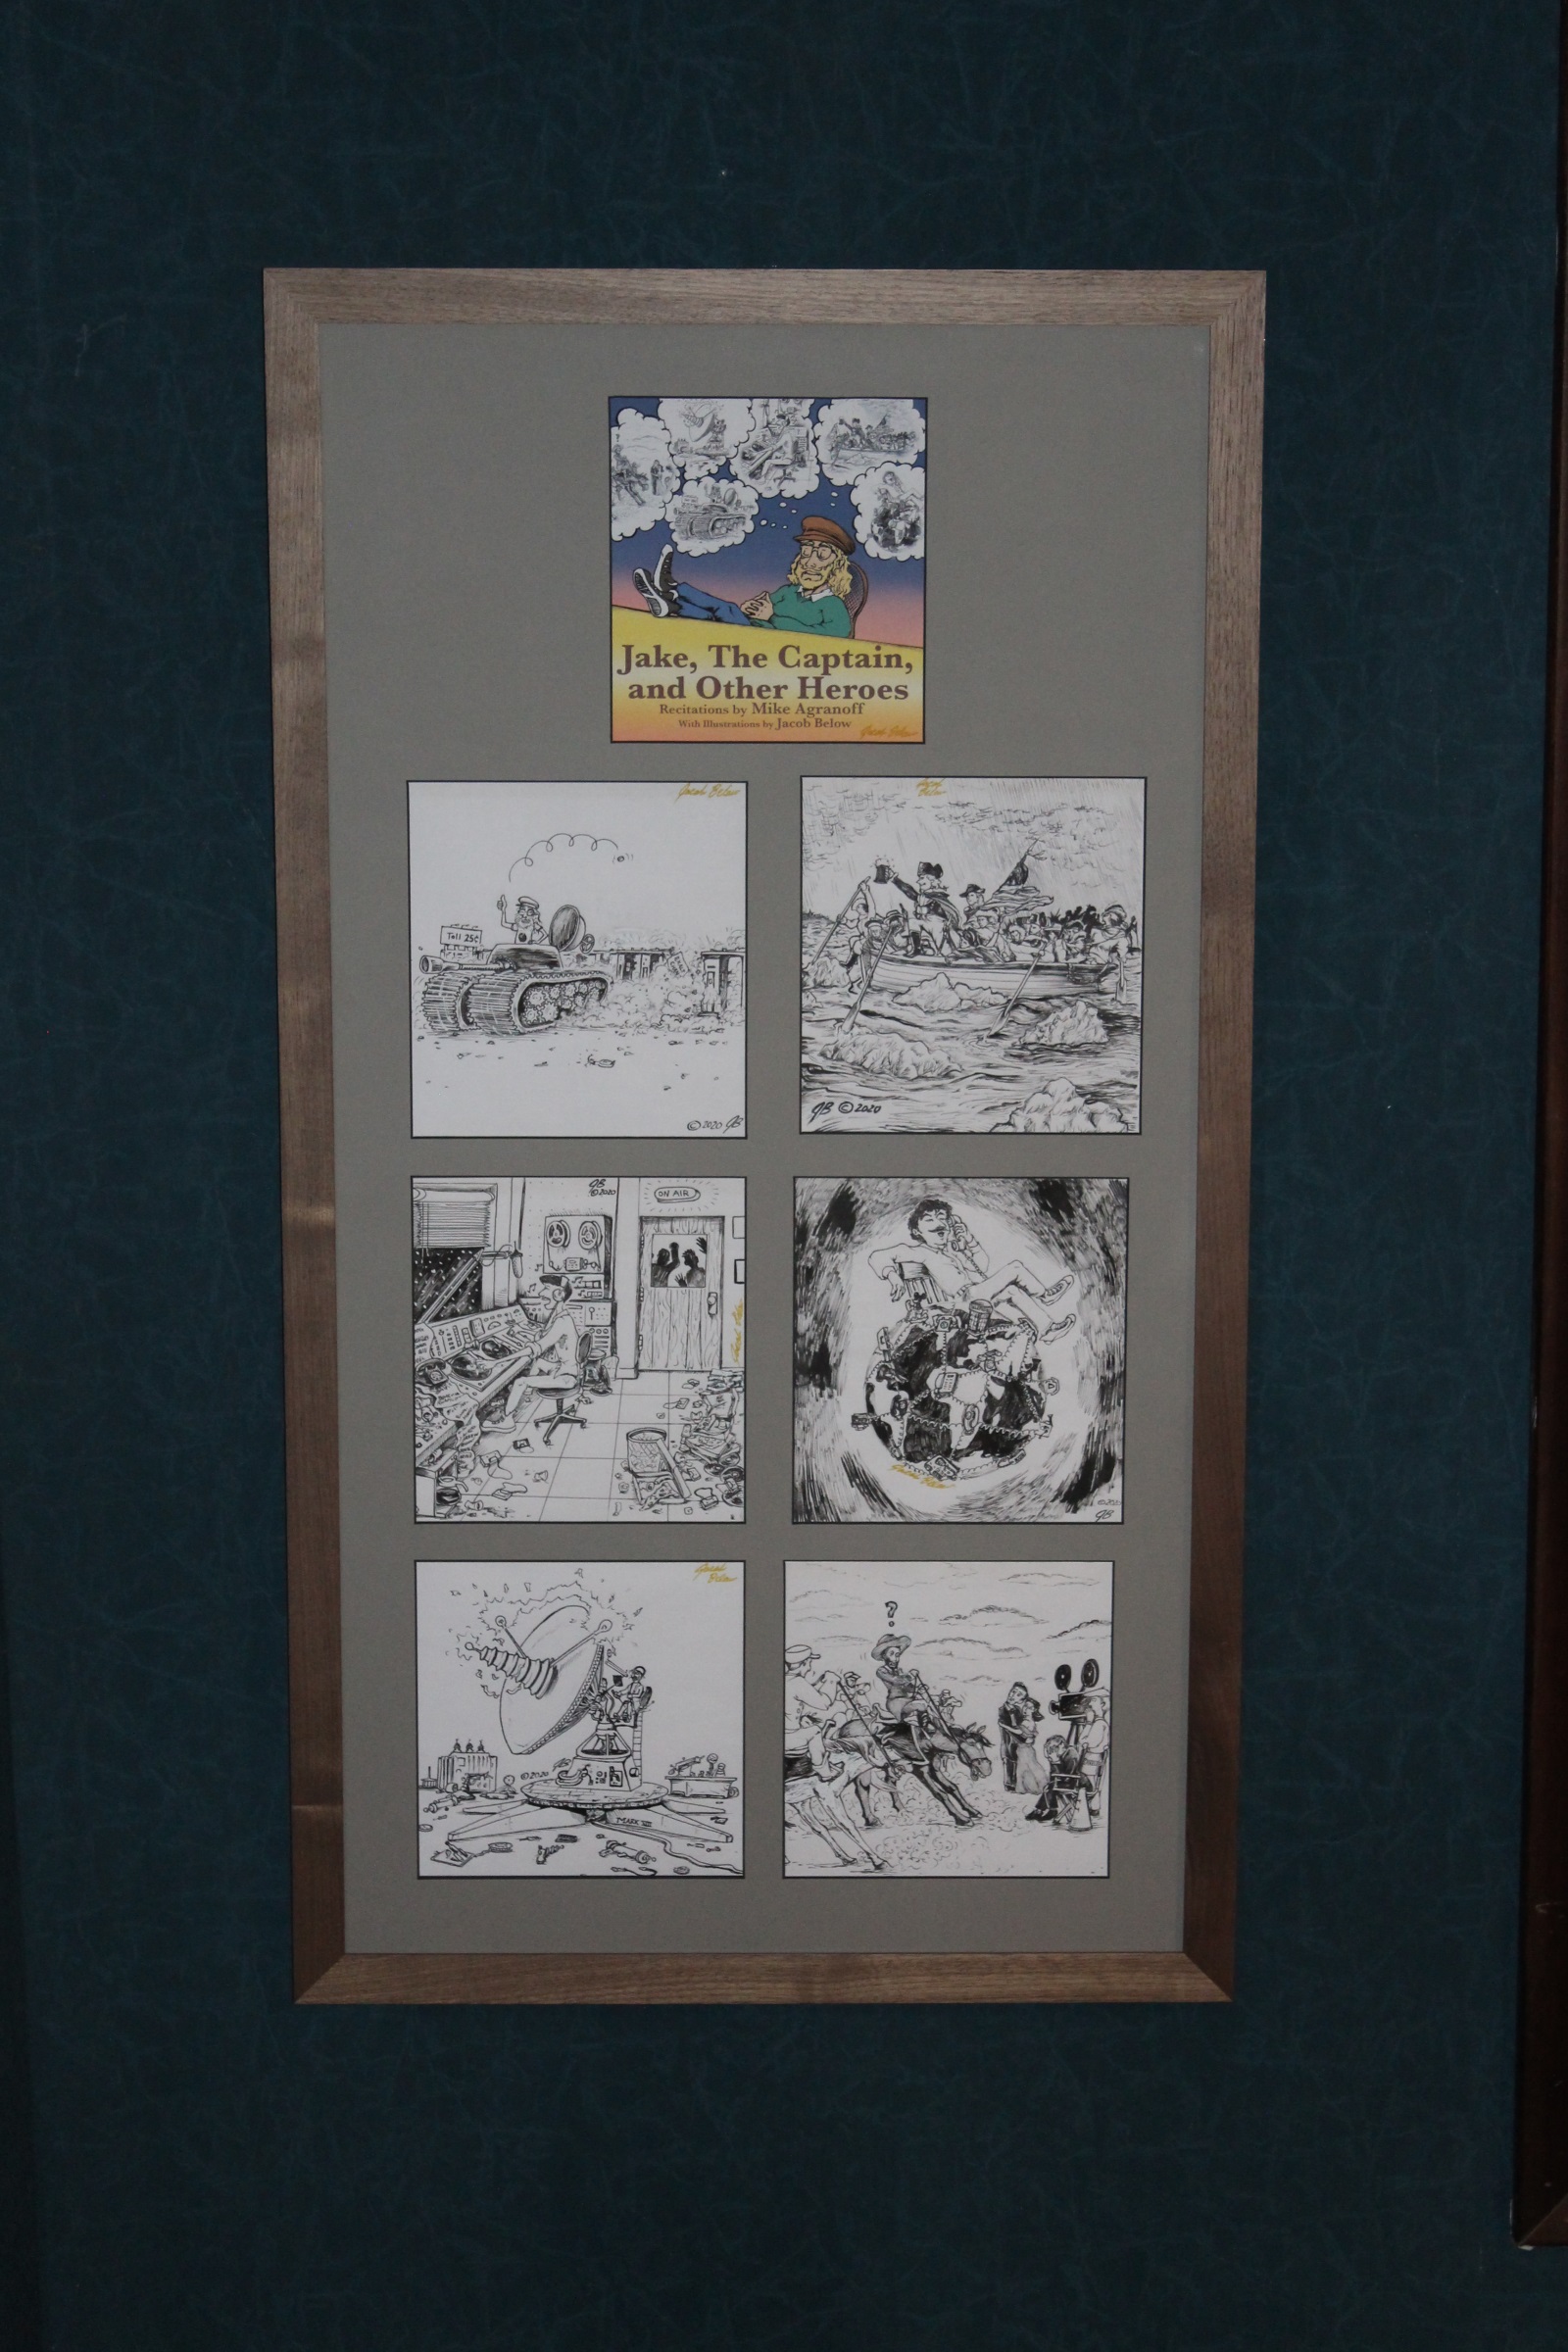
It's a collection of my recitations called Jake, The Captain, and Other Heroes.. It contains every recitation that I wrote except one, which I didn't include because it sucked. I've never performed it, never recorded it, and I can't even find the text, after all these years. That's a good thing. No loss. It was terrible.
This came about on the urging of a fan of mine in Ithaca, NY named Ed Hower. Ed is a partner in a small publishing house called "Cayuga Lake Books". He had made the suggestion once or twice over the years, and most recently, back in May urging me to do it. At the time I was busy as a two-peckered goat (expression © Ken Rolston), but told Ed to bug me again in a couple of months. He did so at the end of August. His timing couldn't have been better. By then, I was clean out of things to occupy my time productively, and going stir-crazy from pandmic-induced cabin fever. I desperately needed a project wherein I could accomplish something. This looked like just the ticket.
Ed told me to put together a preliminary manuscript, and he'd pitch it to his partners at Cayuga Lake Books. That was not a big job. I had the text of all the recitations already on file, and even had the bones of an introduction for each work from my last remaining Xeroxed copy of the 1987 edition. I slapped all that together, wrote up a preface, and sent it off to Ed.
His partners turned it down. Bummer.
Ed told me, don't worry. Put it together yourself, and send it to the guy who does Cayuga's printing. He'll give you our price on my say-so. I did as he suggested. The printer wasn't interested.
I could sort of understand why. Publishers think like publishers, and look at a book's salability in bookstores for the general public. I know there's no real public market for this book. I was looking to print it up in quantities of a couple of hundred or so to sell at gigs like my CDs. I didn't care about marketing it to the masses. So, I poked around in vanity press outlets, and settled on BookBaby.
BookBaby was designed for just such a project. Their website is geared towards the amateur author. "Tell us how many pages of what dimensions, and how many copies you want, make a few other choices like hardcover/soft cover, weight of the paper stock etc, and we'll quote you a price. You can either provide camera-ready pages, or we'll format it for you at a (non-trivial) cost." I opted to have them do the formatting, although I bet the pages I finally submitted were pretty damn close to what they came up with.
I knew I wanted an illustration for each recitation. I even selected an unusual page size of 7-1/2" square, to better accommodate illustrations that would probably be more suitable in landscape format than portrait. The square page would allow the illustrations to be larger on the page. I had in mind pen-and-ink drawings. I shopped around for graphic artists. I thought Laurie Harden, who did my Guy Behind the Tree Logo would be a likely candidate. But she was too busy to take on the project. I asked a couple of graphic artist friends, including Bob Sharen, who used to be a colorist for Marvel Comics. No, he only colored the drawings; he didn't draw them. But he introduced me to the Kubert School of Cartoon and Graphic Art, located only 20 minutes from me in Dover, NJ. That sounded like the perfect source for what I wanted. I got in touch with Michael Kraiger, the Headmaster, and told him what I was looking for. At his recommendation, I put together a job proposal, consisting of an explanation of what I wanted done, a short synopsis of each of the works, and links to audio or video files of performances of the works. Michael distributed the proposal to his students and graduates, and I got three bites. I looked at each of the artists' websites, and settled on 27-year-old Kubert alumnus, Jacob Below.
Jacob turned out to be just the ticket! His skills run from caricatures to landscapes, and he is proficient both in conventional and computer-generated media. He was great to work with, took direction well, and contributed some original ideas that were better than my own. Besides which, he lives 10 minutes from me in Denville, which made it real convenient when in-person consultation was called for. For some of the illustrations I knew exactly what I wanted, and he rendered them beautifully. For others, I had a vague idea of what I was looking for, and he read my mind even though I, myself didn't know exactly what was in it. And there was one for which I had no idea how to illustrate. So I gave him the text to read, and came up with what may have been the best of the lot. (For those of you who have the book, that was the one for "Me and Sammy's March to the Sea".) He would whip out a pencil sketch in 10 minutes. I'd pore over it and suggest a few changes. And then he'd come out with another version with my edits, plus some other ideas of his own. And after a few iterations, he'd ink out the final version.
He was great at rendering people and animals, but was a little light in his conception of machinery and technology of the mid 20th Century. It took him three tries to get DeeJay Sandman's turntable right. I couldn't fault him. He had no experience with the actual hardware. Asking him to draw a turntable would be like asking me to bridle a horse. I wouldn't know which end goes on first. He took correction very well, and came up with a great illustration in the end. In all, he produced a pen-and-ink illustration for each of the six works in the book, and the cover illustration in color. You can see miniature versions of the individual illustrations inside the thought balloons on the cover illustration.
My sweetie Jenny did the copy-editing, and, as usual improved my writing notably, including smoothing out a couple of rough spots in the recitations themselves where rhyming and scansion were not quite spot-on.
As a first-time author, I stumbled through all the unknown territory of obtaining copyrights, and including all the minutia of the copyright page and "...any reference to real persons, living or dead is strictly..." boilerplate. I submitted my final manuscript about a week ago, ordering 250 copies. I put out a notice to my mailing list last week announcing the publication, and offering anyone who placed an order before the books arrived free shipping. I've got orders for almost 50 as of this writing. I think that's pretty good. If you want one, here's a link to my Store page. If you hurry, you may be able to get your shipping free. I'm expecting delivery sometime the week after Christmas.
|
November 2, 2020
Tomas' Pumpkins, 2020
Click on any image for a full screen view.
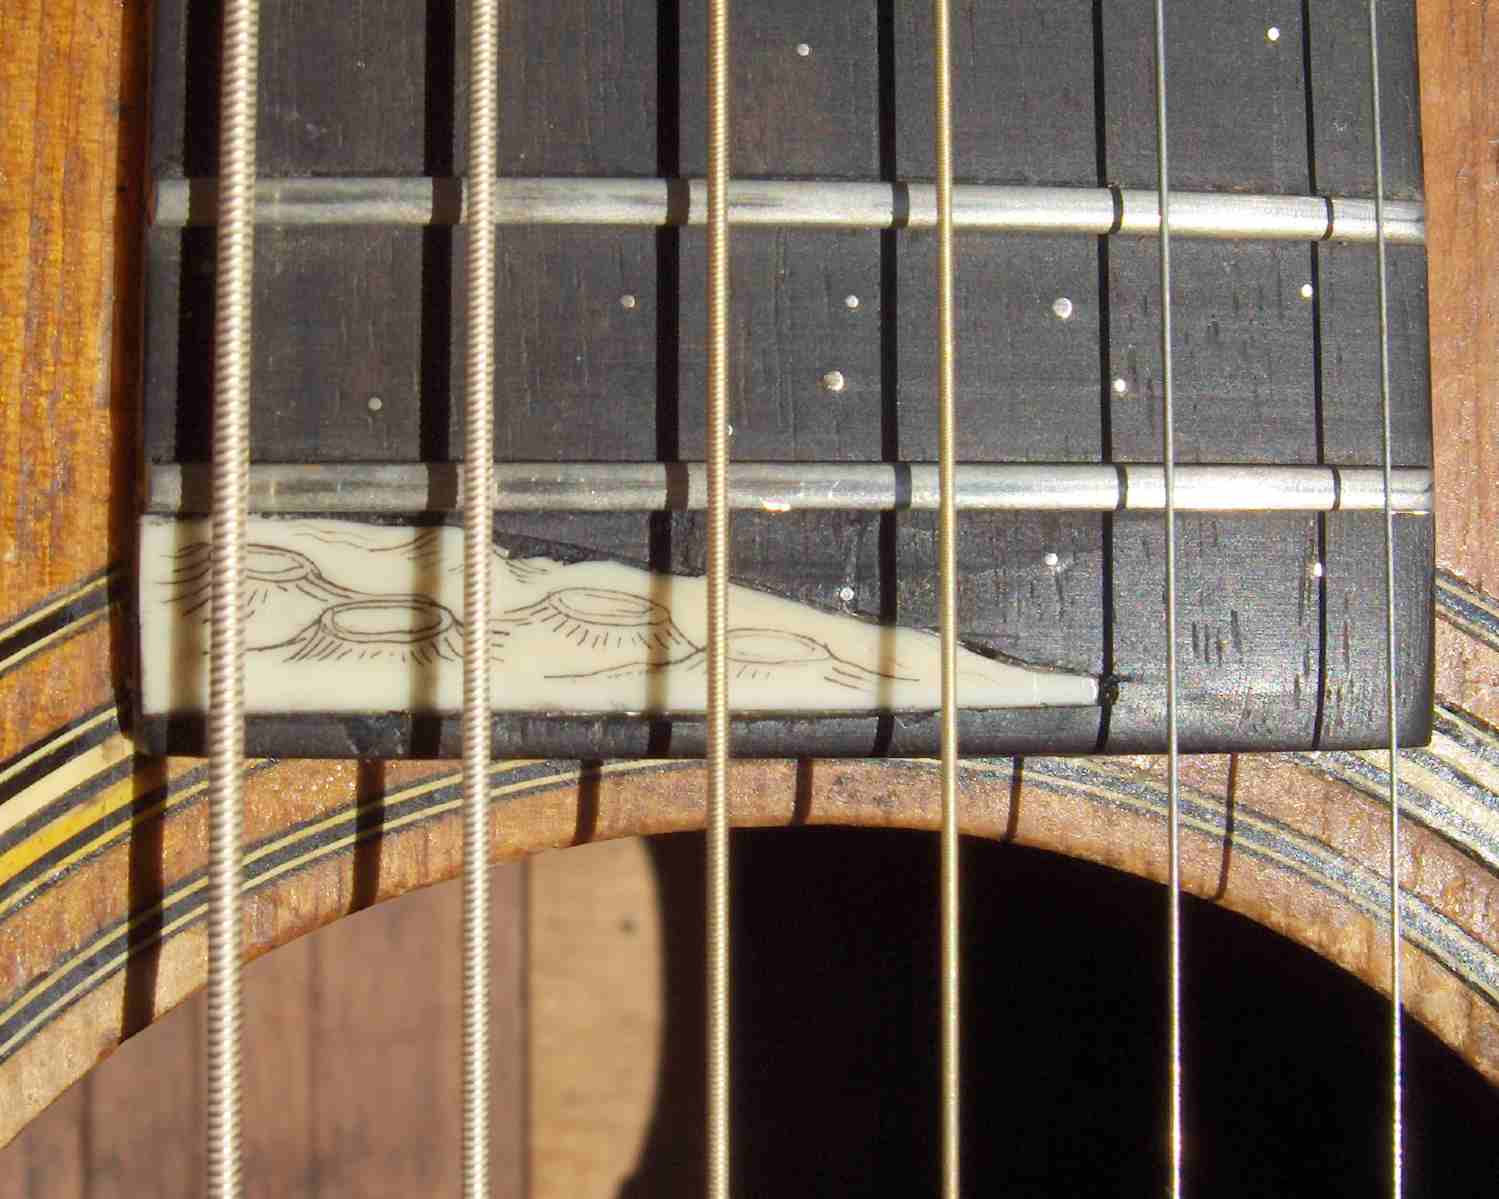
I think this will become an annual posting in this Blog. For those of you new to these pages, my friend Tomas Gonzalez is an artist who works in many media. He created the lunar surface in scrimshaw (engraved bone) for the inlay of my guitar. But he is best known for his work in gourds. Every Halloween, he creates a dozen magnificent jack-o-lanterns, and sets them on display on the fence posts lining the one-lane bridge that leads to his house. It has become an annual party for the neighborhood and well beyond (I travel about 35 miles to see them), with a bonfire and a big pot of chile.
This year, he dispensed with the party due to COVID. But he still set out his display of museum-quality sculpture with a two-week shelf life. The pumpkins were brilliant as usual, but my photos did not measure up this year. It was very cold, and my fingers went numb in short order. It also didn't help that it was quite breezy this year, and the candle flames flickered a lot, and sometimes even got blown out. But more significantly, I really don't know what the hell I'm doing with a camera once I move the dial off "Automatic". I really need to learn how to operate the manual settings.
|
|
|
|
|
|
|
|
|
|
|
|


Tomas' Pumpkins, 2020
Click on any image for a full-screen version.
All of these carved pumpkins are works of Tomas Gonzales of Washington, New Jersey.
This is an ongoing multi-year collection.
Designs for these pumpkins are Registered Copyright ©T.Gonzales
Tomas may be reached at: gonzales.tomas1@gmail.com
To see photos of other years' displays, click here.
Notes on the photos:
Tomas does more than artfully cutting through the rind of the gourds to display brilliant designs lit from within by the candle. He also shaves the thickness of the rind to allow more or less light to come through, thereby producing shading to the designs, giving them more depth. I would venture he is not the only one to use this technique, but his are the only examples I've seen like that.
1-L and 1-R. COVID-19 Masked Jack: This is an example of what Tomas calls "wolf-eyes". The dark pupils of the eyes are created by cutting holes in the back of the pumpkin. So as you move left to right, the dark pupils appear to shift their position relative to the eye holes cut in the front surface, giving the impression of the pumpkin's eyes following you as you move.
2. A House Divided (Abraham Lincoln): If you look carefully, you'll see that this is both a frontal portrait of Lincoln, and two profile portraits face-to-face.
3. Hexy: I had a lot of trouble with this photograph. The array of hexagons that cover the entire surface of the pumpkin, front and back, was somewhat dim, but quite discernable to the eye. But it stubbornly refused to show up clearly in any of the photos I took despite my fiddling with settings. I finally took the best shot I had, and post-processed the image by increasing the brightness and contrast settings to extreme levels.
4. RBG (Ruth Bader Ginsburg): No elaboration necessary on this one, honoring a most honorable Justice of the Supreme Court.
5. Skull's-a-Busting: With and without the flesh. Pretty scary.
6. Shaherazade: Since we're all wearing masks these days...
7. Catamount (Mountain Lion): This pumpkin was somewhat misshapen, suggesting the big cat's head shape. Tomas admits that he probably should have lightened the creature's nose area a little more.
8. Sui Generis Skull: This was also a misshapen gourd with a hollow in what became the cheek area of the skull. That was much more obvious when seen in the flesh (if you can call it that) than in the photo. Sui Generis is latin for "Of its own kind", or idiomatically, "In a class by itself".
9. Jaguar Knight: According to Tomas, " 'Jaguar Knight' is a depiction of an Aztec Warrior. The Aztecs had two military orders of elite warriors; the Eagles and the Jaguars. Each wore costumes/uniforms which embodied their respective totems.
10. Choke in Smoke: According to Tomas, this was mostly an experiment in carving technique.
11 Pride in Biden: Best damn lawn sign I've seen in this whole crazy election season.
Postscript: November 10, 2020:
I put up a notification of this post on Facebook, and a not more than a few hours later someone responded with the following photo:
|
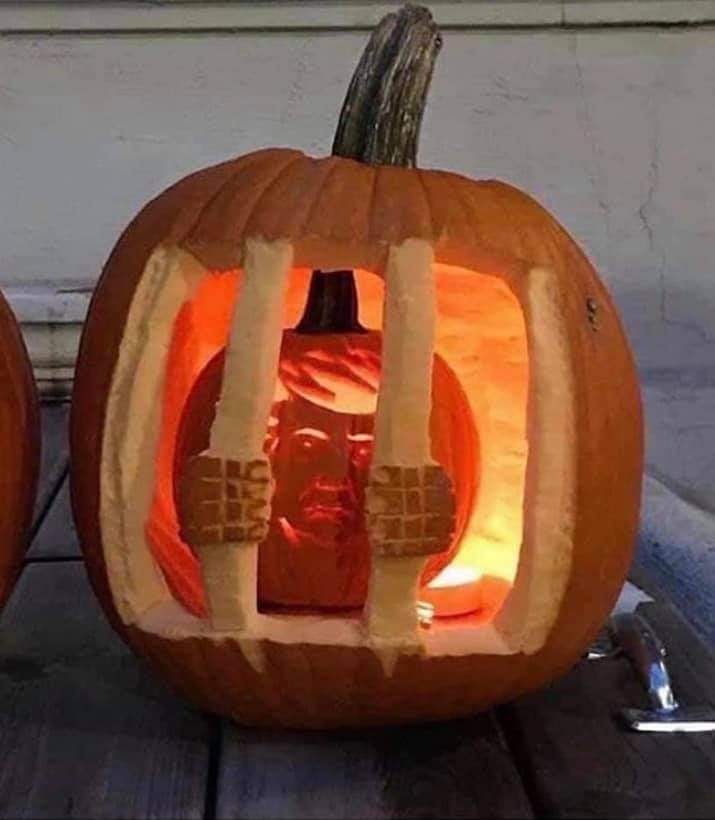
I just couldn't resist appending it here. The work was unattributed. If anybody knows the creator, please contact me through the contact information on the Bio page of my website. At the very least, it confirms my supposition that there are other artists besides Tomas who use the rind-shaving technique to produce shading.
August 10, 2020
The Pythagorean Theorem
Some time during the late 70's there was a series that appeared on PBS television stations called "The Ascent of Man". It was a BBC production, I believe, hosted by Dr. Jacob Bronowski, a Polish anthropologist and mathematician. It was a study in 13 parts of the rise of humankind from tribes of hunter-gatherers to present day civilization, detailing many areas of history, chemistry, mathematics, engineering, genetics, physics, etc. I enjoyed the series so much that I bought the box set of DVDs some years ago, and revisit it from time to time.
There was one segment on Pythagoras, and his famous theorem on relationships between the lengths of the sides of a right triangle. Some of you may remember vaguely the formula A2 + B2 = C2, or "The square of the hypotenuse is equal to the sum of the squares of the other two sides." (There is a terrible long drawn out shaggy dog story, whose punch line is "The squaw of the hippopotamus equals the sons of the squaws of the other two hides." If you've not heard the joke, I'll let you reconstruct i by working backwards from from the punch line on your own as an exercise.) There is also a equally long, and almost as painful mathematical proof of this theorem, that I don't remember. But Bernowski demonstrated a most elegant graphical proof of the theorem on that program which I had never seen in school. And it struck me as such a thing of beauty that I never forgot it. And I thought to pass it on to you here, in hopes you may find it as delightful as I did.
Click on images for a full screen view.
|
|
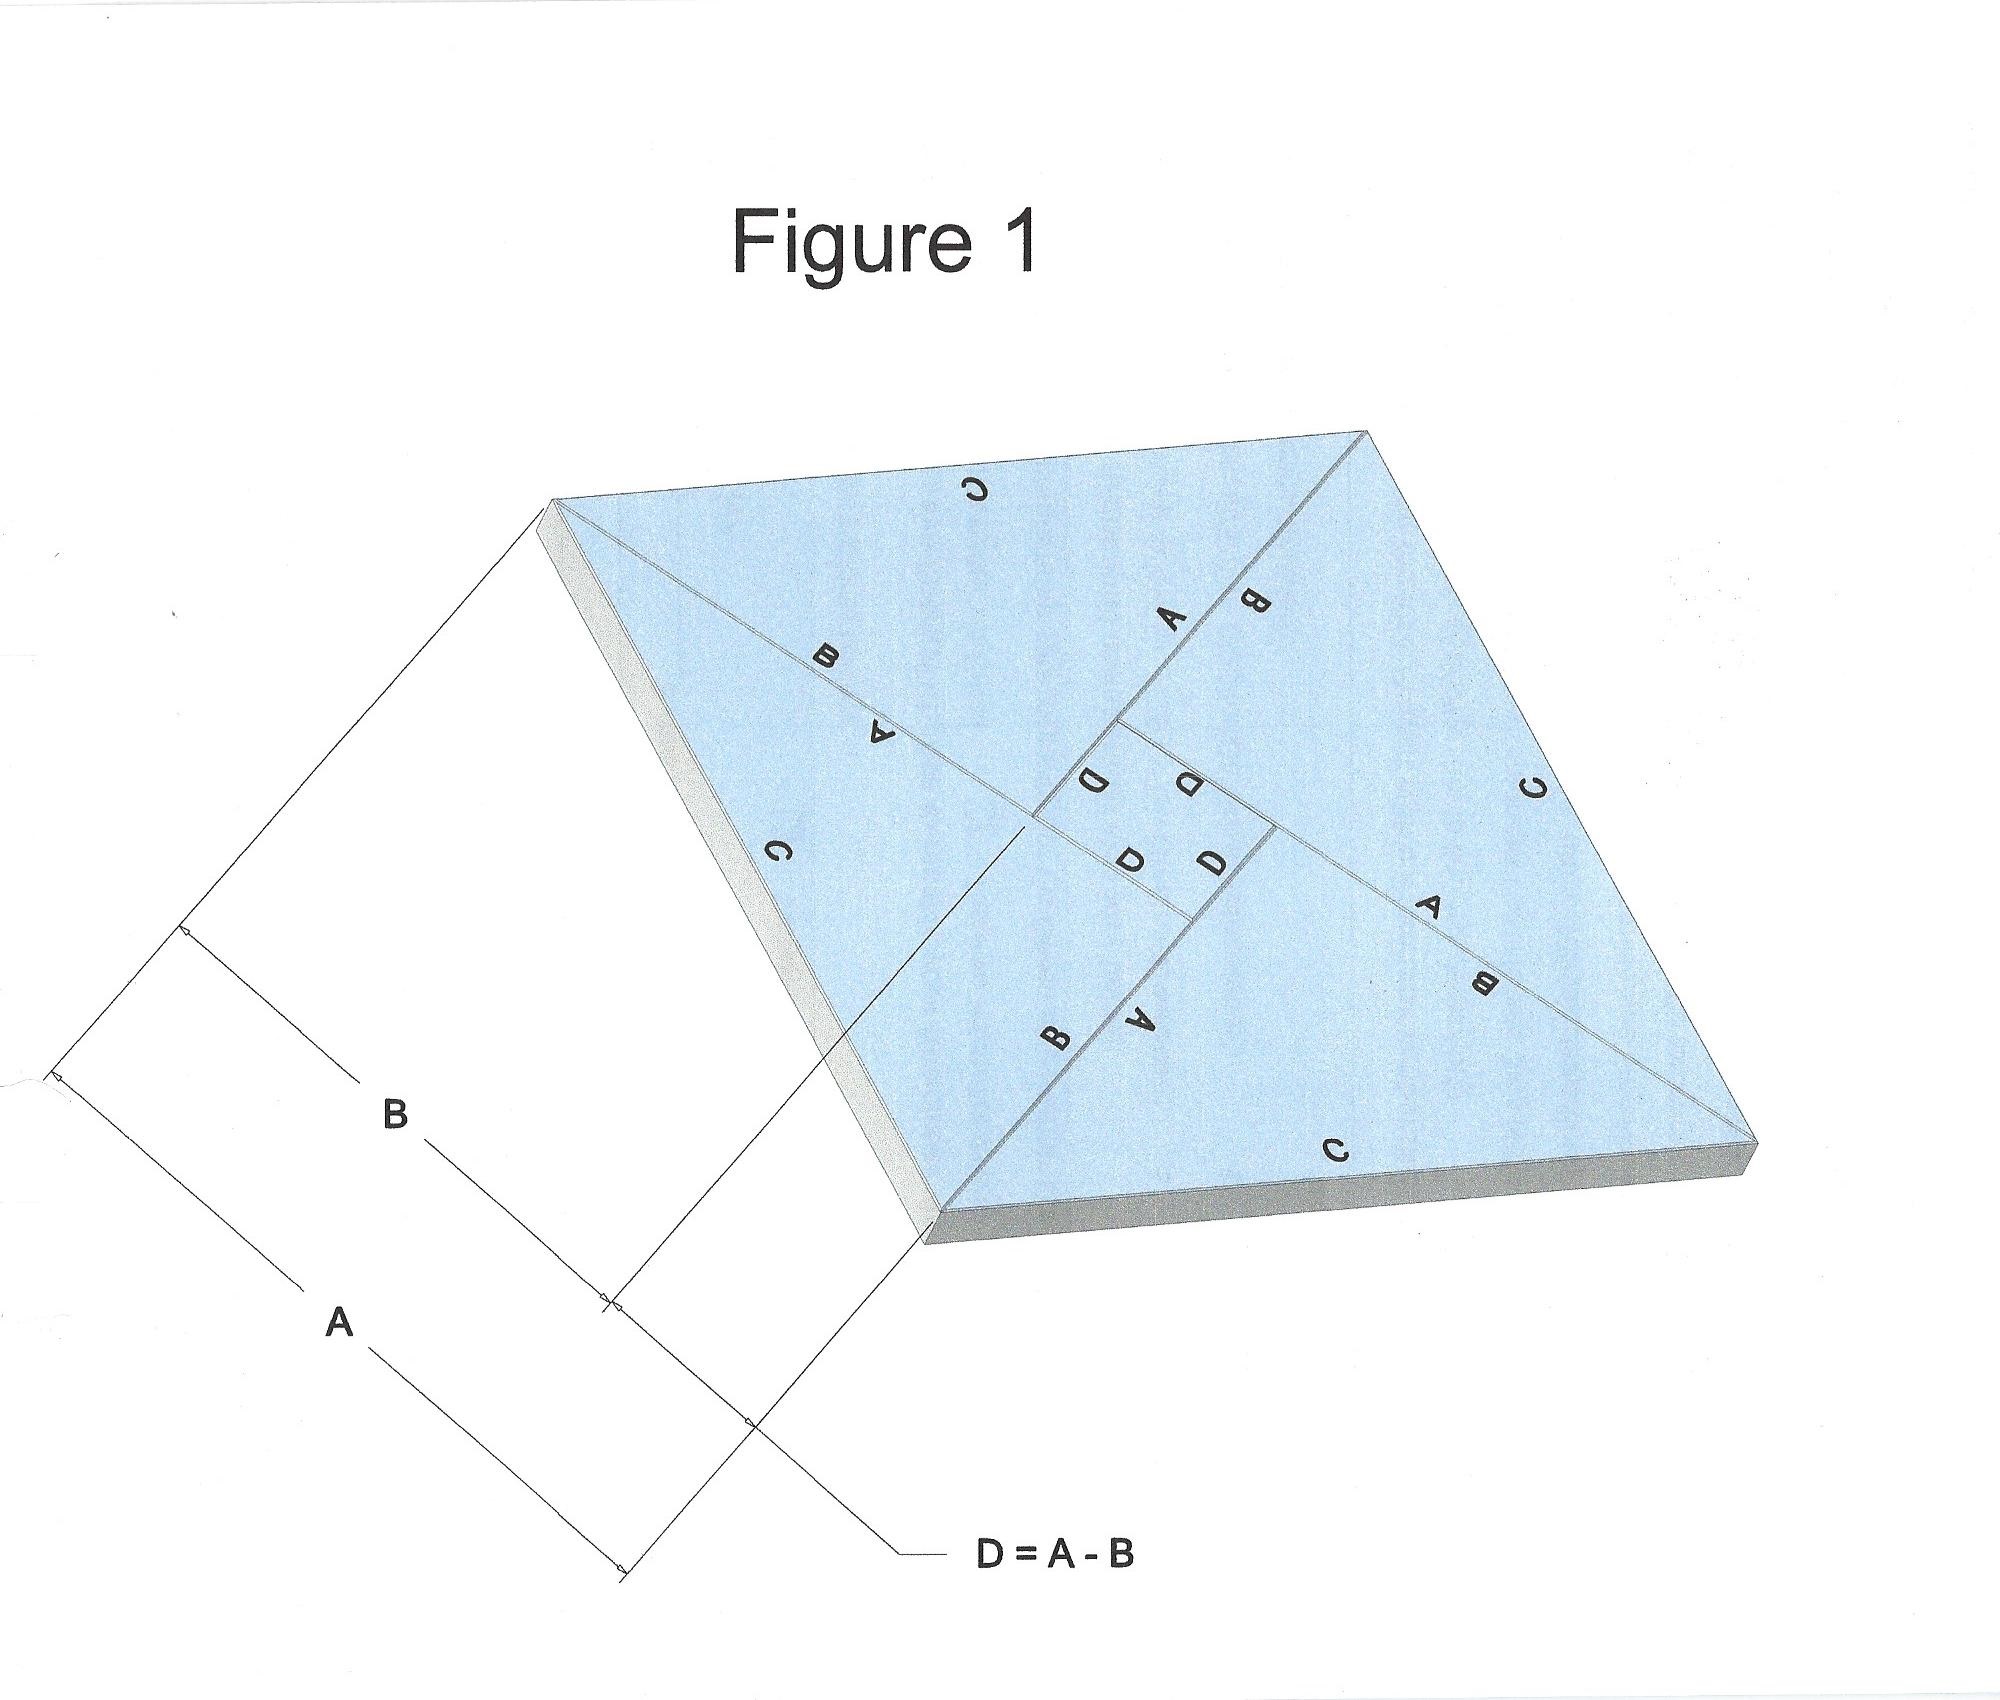
In Figure 1, you'll see a little design I made, consisting of four tiles in the shape of right identical right triangles, with legs of length A and B, and a hypotenuse of length C. I've nested them together as shown, to form a square, with each side of a length equal to C. That left a little square hole in the middle, which I filled with a square tile with sides of length D. (Yes, to make this a truly rigorous proof, I'd have to prove that both the outer perimeter and the inner perimeter are indeed true squares with all sides equal and corner angles of 90°. I could do that, but it would just bog down the proof and mask its beauty. I think you will agree that we can accept that as visually evident.) You can see from the dimensioning that the length of side A is equal to side B plus the length of the side of the square, D. Consequently D = A - B. Since these five tiles form a square of length C, the area of that square must be C2.
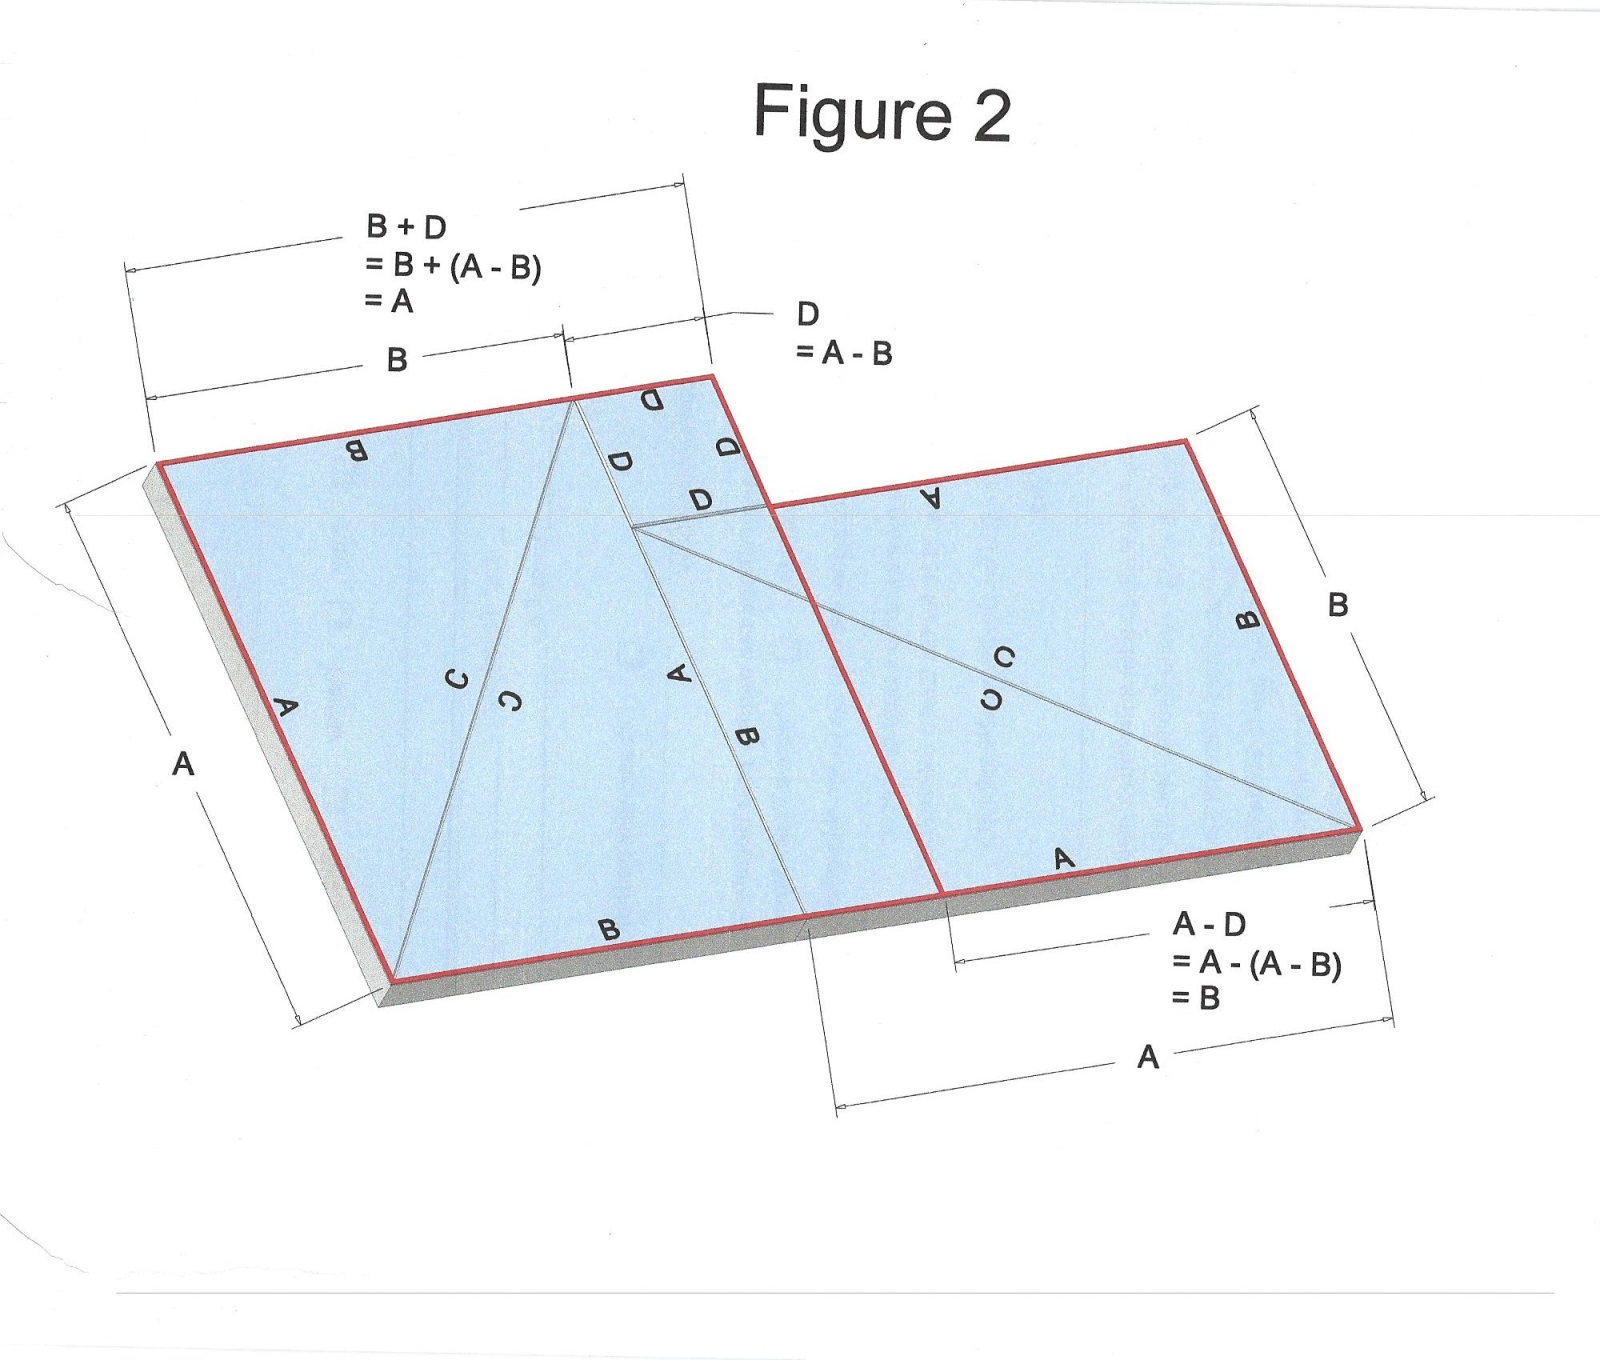
Now, in Figure 2, I've taken those same 5 tiles and rearranged them. With the 4 triangles, I've made two pairs of triangles. putting them together hypotenuse to hypotenuse to form two rectangles. I've placed the short side of one rectangle against the long side of the other, and then stuck the square in the corner where they meet. I've then re-distributed that area into two rectangles as shown by the red lines. Let's look at the lengths of the sides of those red rectangles.
For the left rectangle, it's obvious that the length of the vertical side is A. But what's the length of the horizontal side? You can see from the dimensioning that it's B + D. But again, since we know that D = A - B, that makes the horizontal side B + A - B, or just plain A. So the left rectangle is actually a square, with dimensions A x A.
Now with the right rectangle, it's obvious that length of the the vertical side is B. But what about the horizontal side. Well if you start at the lower right edge, and go left to the end of the side of the triangle, you've gone a distance of A. But then if you go back to the right a distance equal to edge of the square, that gets you to the left edge of the left rectangle, having gone a distance of A - D. But again, since D = A - B, that makes the horizontal length of the right rectangle A - (A - B) = A - A + B, or just plain B. So the right rectangle is also a square, with dimensions B x B.
Since we used the same five tiles to make the pattern shown in Figure 1 as we did in Figure 2, the areas of both figures must be identical. The area of Figure 1 was C2. Figure 2 consists of two squares, A x A and B x B, for a total area of A2 + B2. Therefore A2 + B2 = C2,
QED
Is that not cool?
It was even more dramatic when Dr. Bronowski demonstrated it. He used actual tiles, and moved them around to form the second pattern. I wish I had the technology to animate my tiles.
May 26, 2020
Rube Goldberg lives in This Old House
Click on any image for a full screen view.
Note: Some of the events in the early part of this post were already covered by my October 2019 post, Home Improvement Gone Off the Rails. Logically this post should have preceded that one, because this one is about my Rube Goldberg heating system, while the 2019 post was about the strange adventure I ran into when trying to make an improvement to that system. But to save you the effort of going back to re-read the 2019 post for the background, I'll recap it here as well.
CAUTION: GEEK ALERT! I am an engineer born and bred. My father was an engineer. My favorite toy as a kid was a massive concatenation of two or three Erector Sets. I built flying model airplanes throughout my teens and early 20s. I spent the bulk of my career as a mechanical engineer designing specialized machinery. This post is directed at people like me who find themselves enraptured by cable TV shows like How It's Made, and Great Restorations, and This Old House. If you find yourself zoning out as your significant other binges on such fare, you have my blessing to skip this post. But glance over some of the illustrations before you go, and check out the full-screen versions. I spent a lot of time on them, and I'm pretty proud of how they came out.
RAISING THE HOUSE
|
|
|
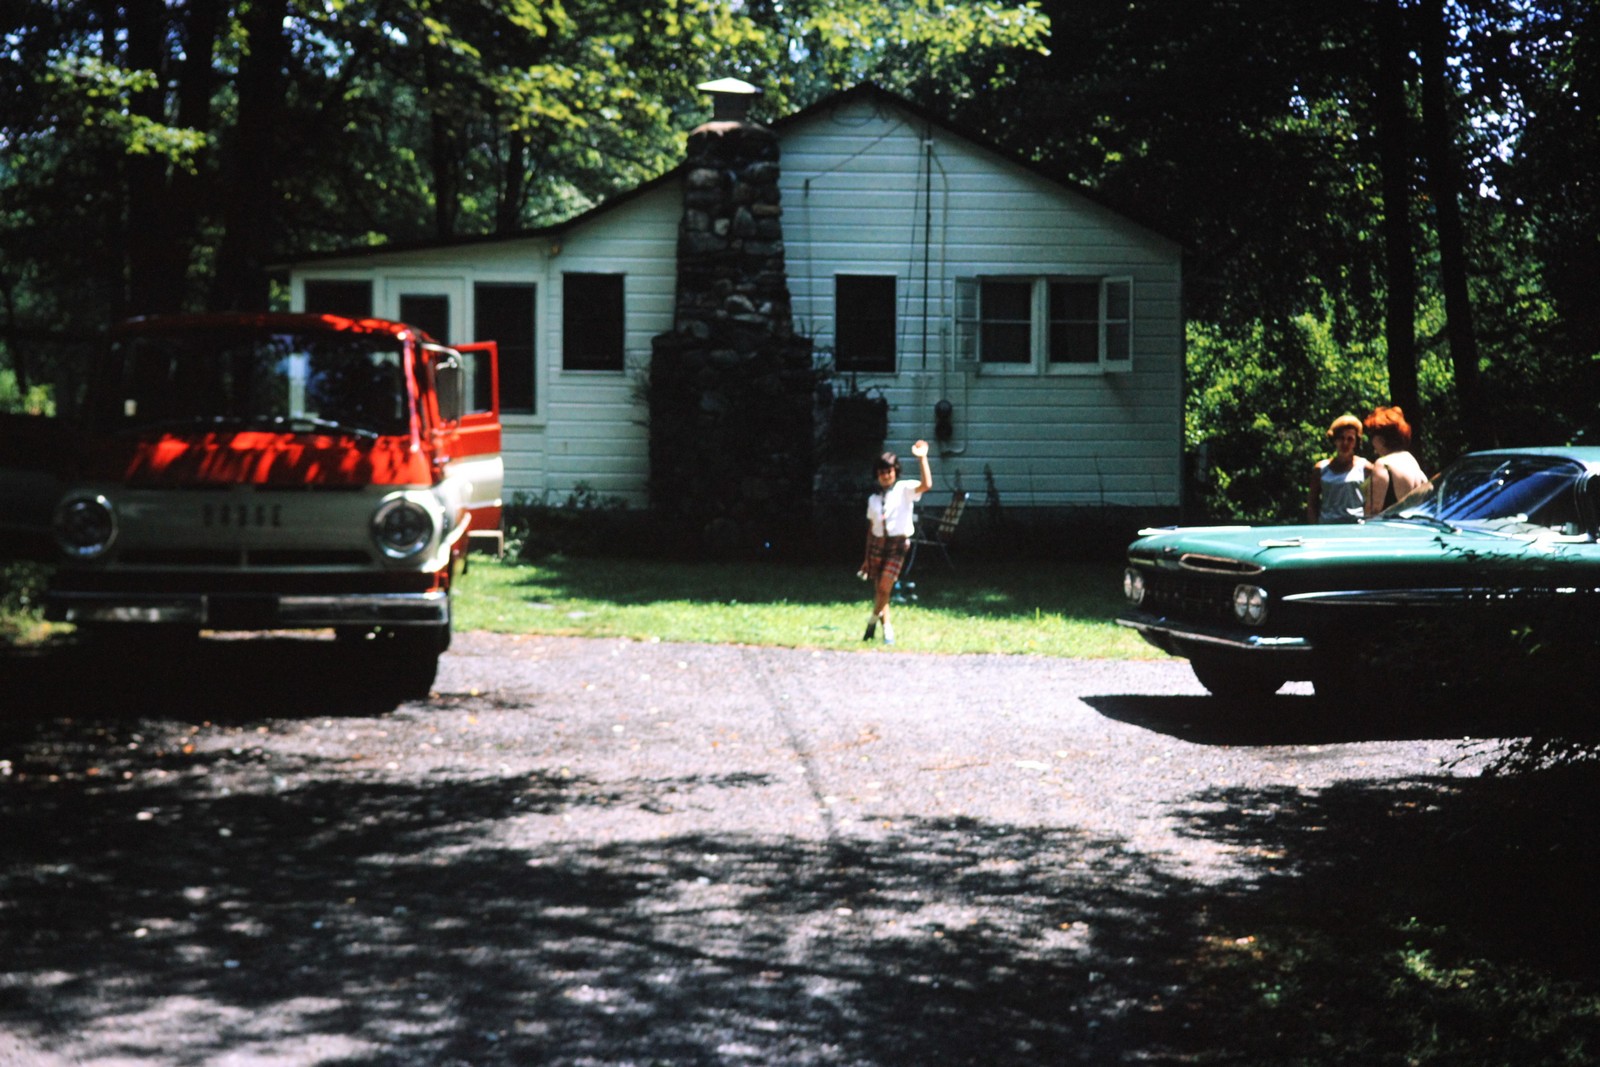

I bought my house in June of 1978.
Built in the 40s as a summer home on the banks of the Rockaway River in Boonton Township, New Jersey, it has a kitchen, bath, two small bedrooms, and a lovely knotty pine living room with a fireplace and a fieldstone chimney. It originally had no insulation, and only a through-the-wall propane-burning unit for heat, since the house, like all the others in the development, was used as a seasonal summer retreat for New York city dwellers. There were lots of big windows for cross-ventilation cooling. By the time I bought it, it had been crudely "winterized" with an oil-fired baseboard hot water heating system, and what little insulation could fit between the 2 x 4 studs in the walls. The place could get pretty chilly when the temperature dipped into the single digits. I figured that's OK. The house was real cheap, and I'd have lots of time to work on it in the coming years.
Then the following February, the Rockaway River came to visit. We got 5 inches of rain in two days on frozen ground that could not absorb it, and I got about two and a half feet of water in the house. That led to several months of work replacing sheetrock and insulation, ruined furniture, and my grandmother's baby grand piano. I knew I'd have to do something about that. It was surely going to happen again sometime, and I couldn't in any good conscience sell the house, knowing it would happen to the buyer. I also knew that the house next door to me had been raised some years before to avoid just such problems. I spoke to the owner, who put me in touch with the contractor who had done the job for him. I hired that contractor and made arrangements that the same operation be done to my house.
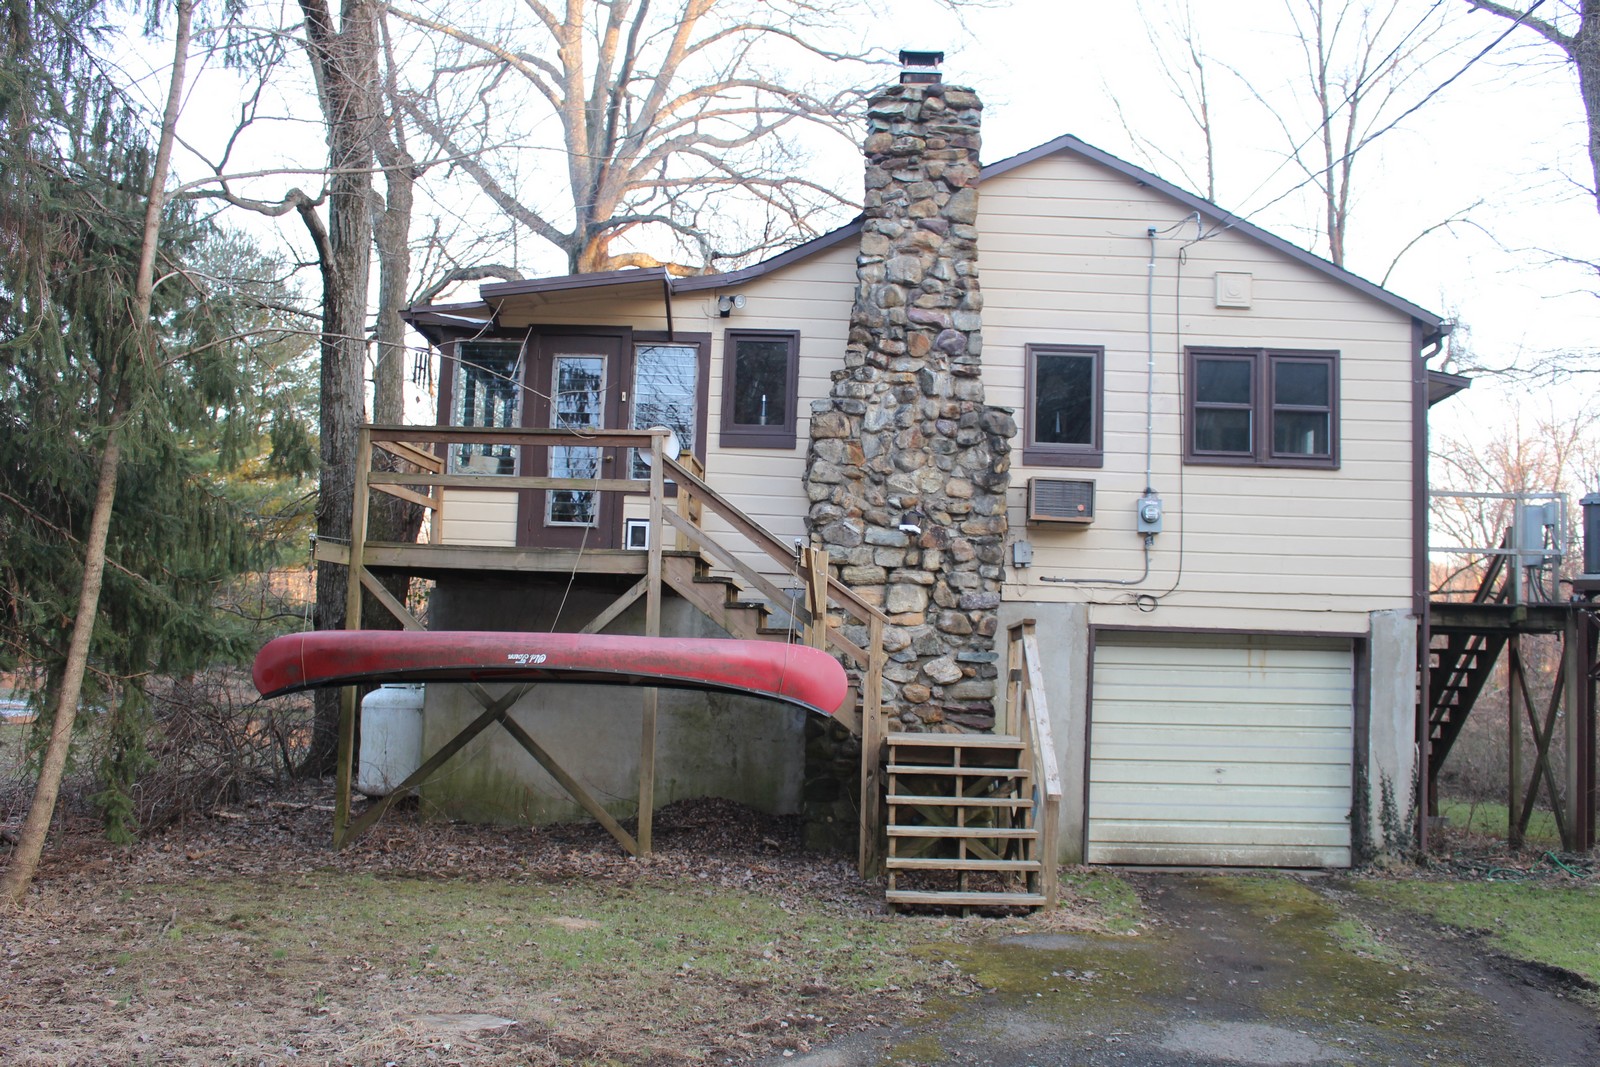
That was an interesting project worthy of a Blog post of its own, which I may write some day. Alas I did not own a camera back then, and I have no photos of the operation. The work started that spring, and continued through the summer. I lived in the house throughout the process. By September or thereabouts, that little bungalow was about 6-1/2 feet higher than it was in May, and what had been a crawlspace was now a full height garage, occupying the entire footprint of the house. However, before any work could be done actually lifting the house, I would have to take down that lovely fieldstone chimney, because there was no way of lifting it along with the wooden structure. So, in the weeks before the job was to commence, I was up on a ladder with a hand sledge and a stone chisel dismantling my chimney stone by stone. It turned out to be not so hard a job. And seeing how the chimney was constructed, I undertook to rebuild it myself from the stone pile from the old chimney plus more rocks I could glean from the neighborhood. They call it "fieldstone" for a reason.
THE WOODSTOVE
|
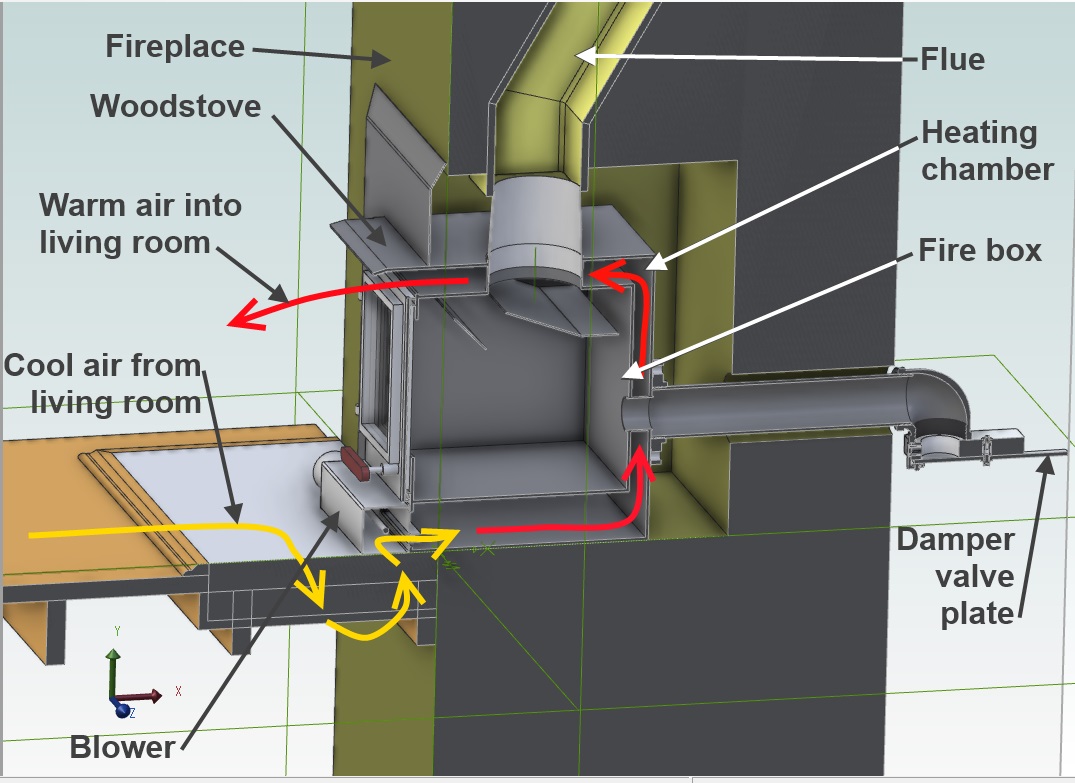

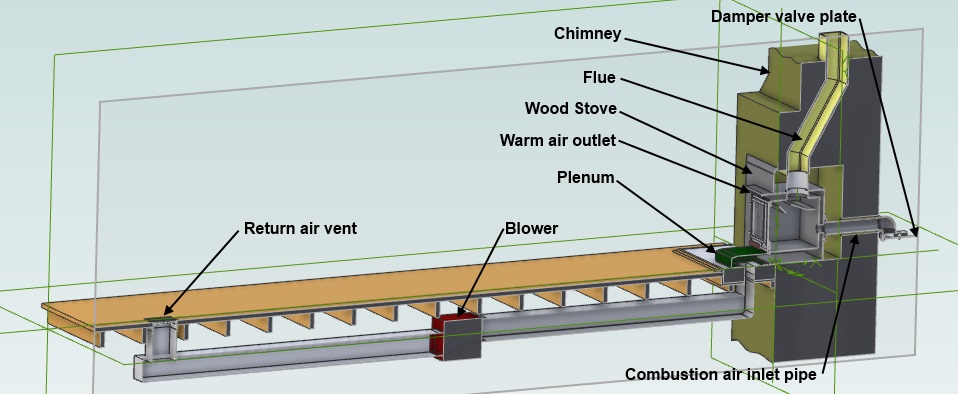
To make a long story short, that's exactly what I did once the house was up on its new foundation. I became an amateur stonemason, and started building a new chimney. But I got to thinking: As long as I'm building the chimney from scratch, why don't I install a woodstove insert in the fireplace, and get some real useful heat out of the fire? I knew a stove insert in a fireplace isn't as efficient as a free-standing stove in the room, since a lot of the heat from the back of the insert goes up the chimney. So I shopped around, and found a stove with a double wall construction around the firebox. It was equipped with a blower that blew room air into the chamber between the two walls of the fire box. That air was heated by the hot walls of the firebox, and came back out into the room at the top of the stove. (Fig. 4) That would mitigate much of the relative inefficiency of an insert versus a free-standing stove.
I also decided to add one more enhancement to the stove's efficiency I had heard about somewhere. The stove as designed got its combustion air from inside the house, taken in through louvres in the front doors of the stove. That's typical of almost all woodstoves: that they use room air for combustion. But removal of air from the house will draw in cold air from the outside to replace it through cracks and gaps in the structure, of which that house had plenty. That wouldn't happen if I could draw the combustion air directly from the outside, rather than using inside air. So I had the stove manufacturer put a hole in the back of the stove, and weld a pipe fitting around that hole, into which I could thread a length of pipe that would go all the way through the stonework of the the chimney to the outside. The fire could then get its combustion air through that pipe. Since I was building the chimney, I was able to build the stonework right around the pipe. (Fig. 5)
REGULATING THE FIRE
|
|

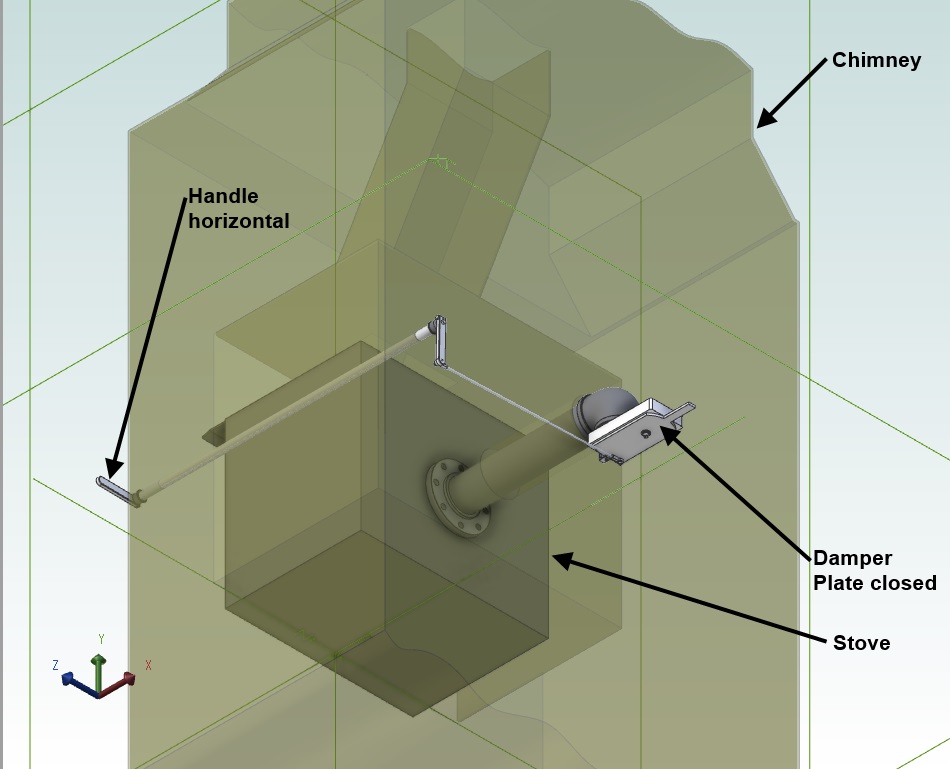
The stove did not use a flue damper to regulate rate of combustion. Instead, it regulated intake air by means of a sliding plate that would open or close the louvres in the doors of the stove. I fully shut the louvres, and sealed them with fiberglass tape, so combustion air could enter the firebox only through the pipe in the back. But then I had to come up with some means of regulating the airflow into the intake pipe to control the combustion rate. I designed and manufactured a damper valve with a plate that could be rotated to cover the intake opening to the degree desired. I also designed and manufactured a linkage from the damper plate to a handle inside the house to allow me to adjust the damper plate position from inside the house. (Fig. 6 and 7 show the damper in the open and closed positions.) Again, since I was building the chimney at the time the stove was installed, I was able to build the stonework to the proper height, lay the adjusting shaft in its housing on top of the stonework, and then continue building the chimney around the housing.
Late one Sunday afternoon in October as it started to get dark, with the temperature hovering around 35° and dropping, I set the very last stones at the top of the chimney in place. I went inside, washed up, and lit my first fire in the stove. All seemed to go well. The chimney drew well, and no smoke came into the room. When the larger sticks of wood were fully engaged, and the fire roaring, I closed the damper. The flames, visible through the Pyrex glass windows in the doors, obediently subsided. Quite proud of myself, I switched on the fan unit. Warm air emerged from the heating chamber outlet, and I felt I had done well.
BETTER DISTRIBUTION OF THE HEAT
|
|
But as fall progressed into winter, I became less than fully satisfied with the operation of the system. The fan was noisy, and didn't really seem to be distributing the warm air very far the back in the house. There was a noticeable temperature gradient from the front of the living room near the stove to the back. When the outside temperature dropped into the teens, the bedroom got downright chilly. The thermostat for the main hot water heating system was located in the living room, so it never called for heat while the stove was running. And the only heat the bedroom could get was what would trickle in from the cooler end of the living room. If I set the thermostat high enough to get the bedroom up to a comfortable temperature, then the living room would get heat from both systems, and get too hot. And what was the point of trying to heat with wood, if I still had to burn oil to get the back rooms comfortable? Something had to be done to distribute the stove's heat more evenly through the house.
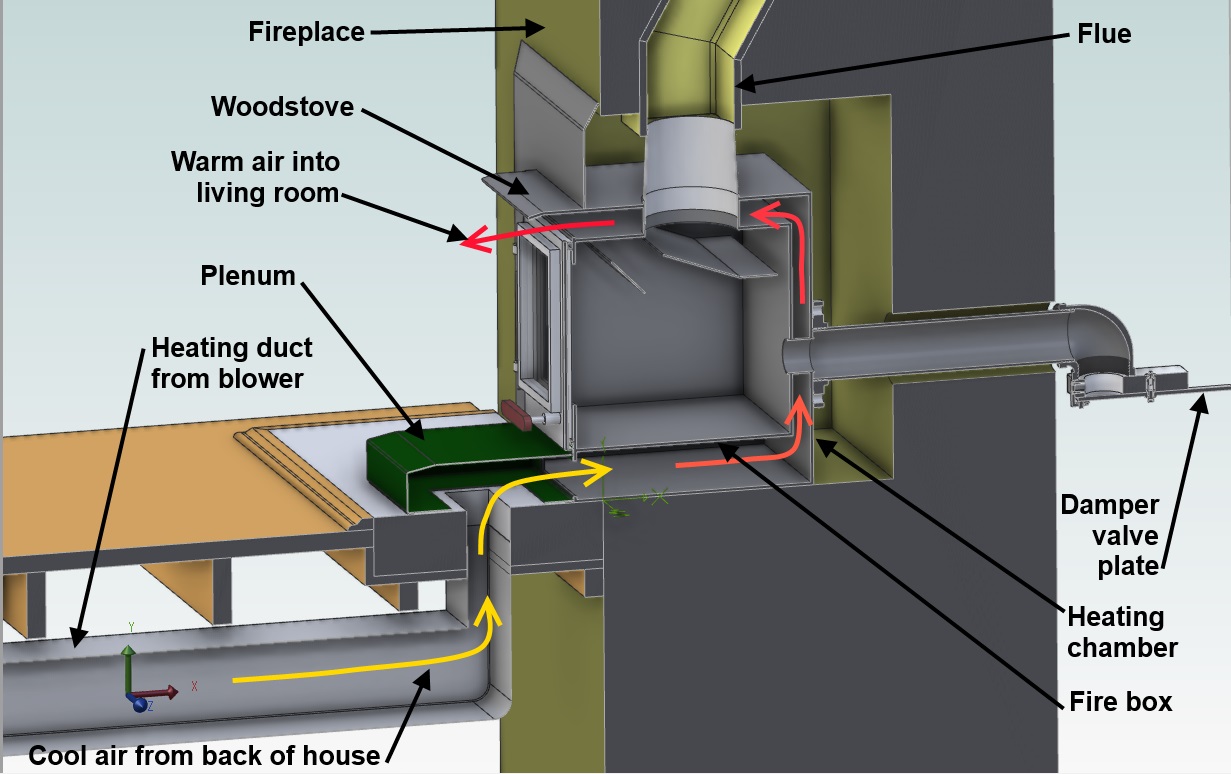
I came up with a plan. I don't remember if I implemented it the following summer or the year after, but here's what I did. I removed and discarded the stove's blower unit, and replaced it with a plenum, which I designed, and had manufactured by a sheet metal manufacturer. (A plenum is a specially designed hollow chamber to direct flow of air or water.) The plenum had one opening into the stove's heating chamber where the blower unit used to discharge, and another rectangular opening in its bottom. I broke a hole through the cement hearth through to the garage below, lined up with the hole in the bottom of the plenum. And through that hole I ran commercial house ventilation ducting down through the hearth, and then horizontally under the ceiling of the garage downstairs to a commercial forced hot air blower, and then further to an intake vent in the floor at the back of the living room. (Fig. 8). I wrapped the duct work with fiberglass insulation to minimize the heat loss from the air in the duct to the unheated garage space. So now, when I turn on the blower, it draws the cooler air at the back of the living room through the vent, and blows it through the heating chamber of the stove. (Fig. 9.) And because air is being removed from the back of the room, the warm air coming out of the stove migrates to the back of the room to take its place, distributing the heat much more evenly through the room.
That worked like a charm! With the back of the living room almost as warm as the front, there was enough circulation by convection to get the two back bedrooms if not equal in temperature to the living room, at least not uncomfortably chilly. With the stove cranking at full blast, the firebox full of wood and the damper fully open, I could get the living room 80° above the outside temperature, and the back rooms maybe 65° above the outside temperature. That was considerably better than the main hot water heating system could do; running full out, it would get the house maybe 60° above the outside temperature.
HEATING THE OFFICE
|
I didn't mind the bedroom being a little cool, since I never spend much time in that room except when I'm asleep under the covers (on a heated waterbed). But the smaller bedroom, which I use as an office, can get a little chilly on cold days. I found, if not a solution, at least a pretty clever mitigation to that problem. I bought a small muffin fan in a housing that fits in a cutout in a wall. I don't remember where I saw it listed; some sort of catalogue, I think. I installed it above the door to my office. It's reversible. And when I say reversible, I mean reversible. Click Video 10 and check it out. In the winter when I'm heating with the woodstove, I set it to blow into the office. The warmer air that rises to the ceiling of the living room gets blown into the office. The cooler air in the office goes back out the door, and gets drawn into the woodstove's return vent in the floor nearby. And in the summer, on the few days when I run the air conditioner in the living room, I reverse the fan to blow the warm air near the ceiling of the office out into the living room, to be replaced through the door by the cooler living room air. It makes a difference that is noticeable over time, albeit not dramatic.
DISASTER
That all seemed to be working pretty well. I thought I had the world by the tail in the heating with wood department. Then, sometime in the following winter, we had a cold snap that drove the temperature down into subzero territory. I had the stove roaring away, and I was all comfy and happy, and went to sleep with a smile on my face. But sometime in the wee hours, I was awakened by a loud GUNNNNGGG! I sat up in bed, and it was cold in the house. I mean really cold! 40° or 50° cold. In an instant, I knew exactly what had happened. While I had been comfy and happy in the living room, so had the thermostat, which was also in the living room. Since the thermostat wasn't calling for heat, the circulator pump for the hot water never turned on. And the water in the heating registers next to the cold outside walls stood still, and got colder and colder until it froze. So in the middle of the night when the fire went down, and the thermostat finally called for heat, the circulator pump turned on, but the water couldn't move past the frozen blockages. Consequently, no heat was distributed through the house, which got colder and colder until one of the pipes burst, which was the sound that woke me.
Over the next few hours more pipes burst. Of course, they didn't spray water all over the place, because they were frozen. But I knew they would let go once the temperature warmed up, and the ice melted. So I shut off all the valves to the heating system, shut down the boiler, and built a fire in the stove, so I'd at least be warm in the house. Over the course of the next three days, I had every pipe in the entire heating system in my hands at one time or another, replacing burst sections, separated joints, and damaged heating registers. A lot of the work took place down in the garage at temperatures hovering around 10°. When I finally had everything back together again, and the hot water system back in operation, I sat down to figure what to do about the situation.
The Solution
|
|
|
|
I figured the best way to keep the water in the heating system from freezing would be if I could keep it circulating while the woodstove was in operation. That way the water might go through an area against an outside wall that was very cold, but it wouldn't stay there long enough to freeze. Since most of the heater pipe circuit runs through warmer areas of the house, the water would pick up heat from those areas, and never get cold enough to freeze when briefly passing through the cold areas, so long as it kept moving. If I could turn the circulator pump on while the woodstove was in operation, that would solve the freezing problem.
But if I turned the circulator pump on, the water would also pass through the heat exchanger of the boiler, and wind up heating the house with oil, just as if I had turned up the thermostat. That would defeat the whole purpose of the woodstove. But suppose I plumbed in a bypass pipe that would allow the water to run through the system, but take a shortcut bypassing the boiler. Then I could put a valve in that bypass to open it while heating with wood, or close it when heating with the hot water system. But then I'd have to get up in the middle of the night to throw the valve to direct the water back into the boiler when the fire died down in the stove. That would be very inconvenient, and potentially disastrous if I fell asleep and didn't throw the valve before the house froze up again.
But...
If I could make that operation automatic...
What could I use to signal the bypass valve to close? I'd want to do that when the temperature of the living room dropped below a certain point. What point? The thermostat setpoint. Holy smoke! I had a sensing device to trigger the return to hot water heat already installed in the house: the thermostat.
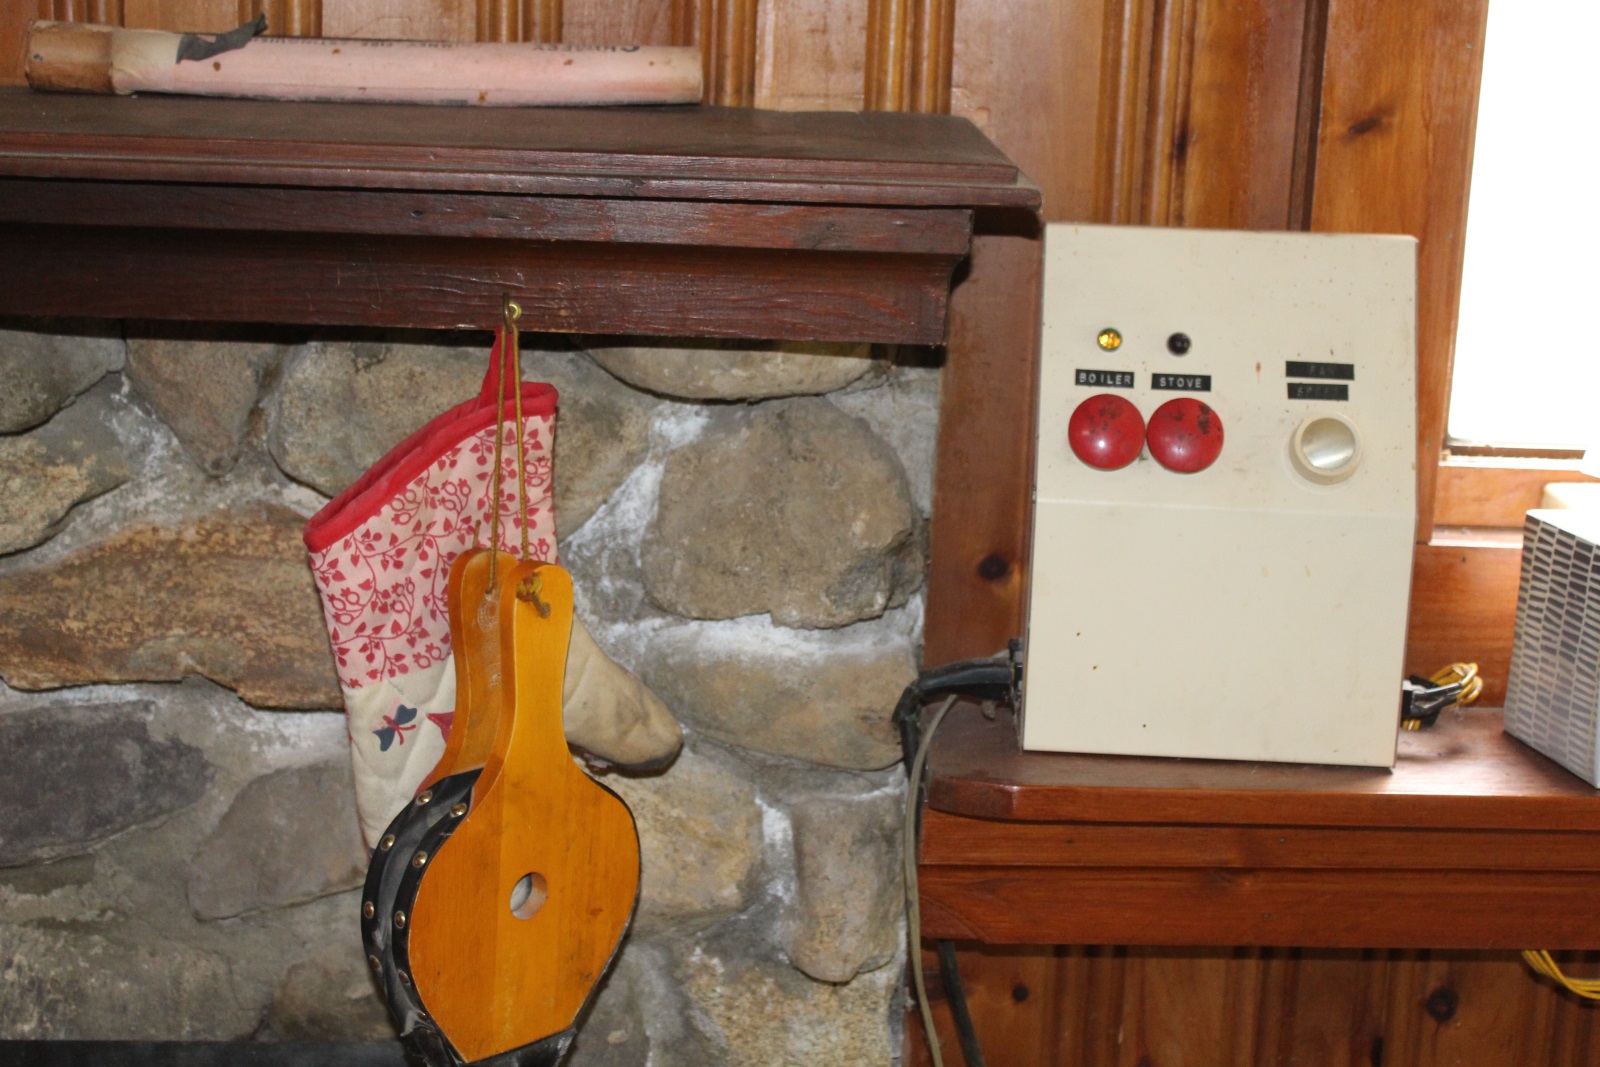
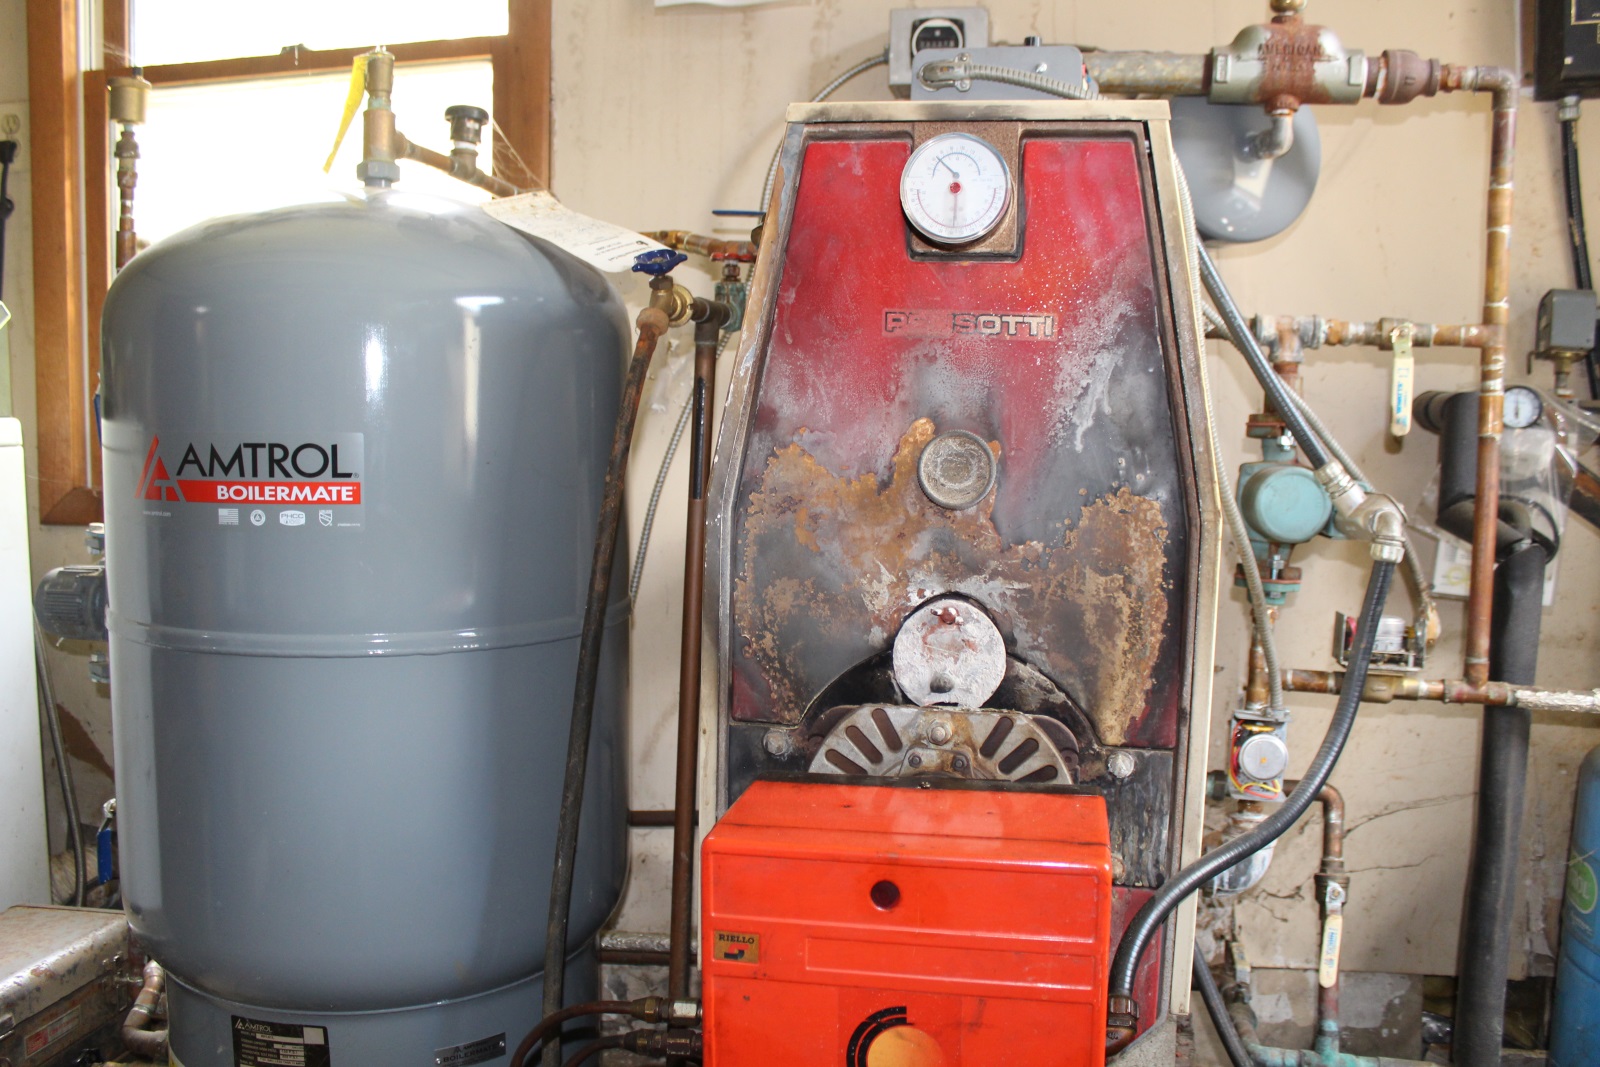
So I got to work. I plumbed in a bypass pipe as shown in Figures 13 and 14. I installed a zone valve in the bypass pipe and another in the pipe to the boiler. (A zone valve is a standard commercial item used in hot water heating systems that turns on or off the flow of hot water to a particular zone or room in the house.) When done, it reminded me of the animated credits of Monty Python's Flying Circus, showing an ever-growing tangle of intertwining pipes; enough to give a plumber nightmares (Photo. 12). To operate all of this gimcrackery, I cobbled together a control circuit inside the control box shown in Fig. 11, employing a bunch of spare parts scrounged from the experimental laboratory at work, and 1950s relay logic technology. I wired it all into the zone valves, the boiler control circuit, and the thermostat. The control box has two buttons: one labeled "Boiler", and the other labeled "Stove". When I press the "Stove" button, it does four things:
1. Turns on the blower that sends air through the chamber around the stove.
2. Overrides the circulator pump control in the boiler control circuit, forcing the pump to operate continuously.
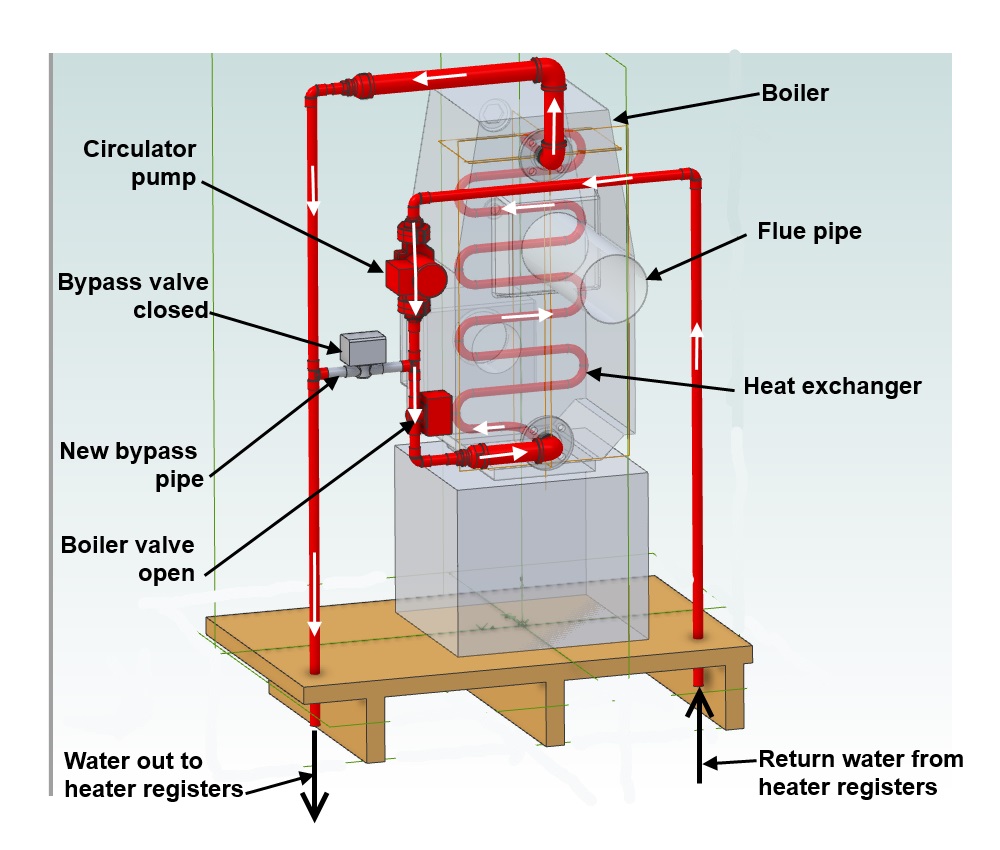
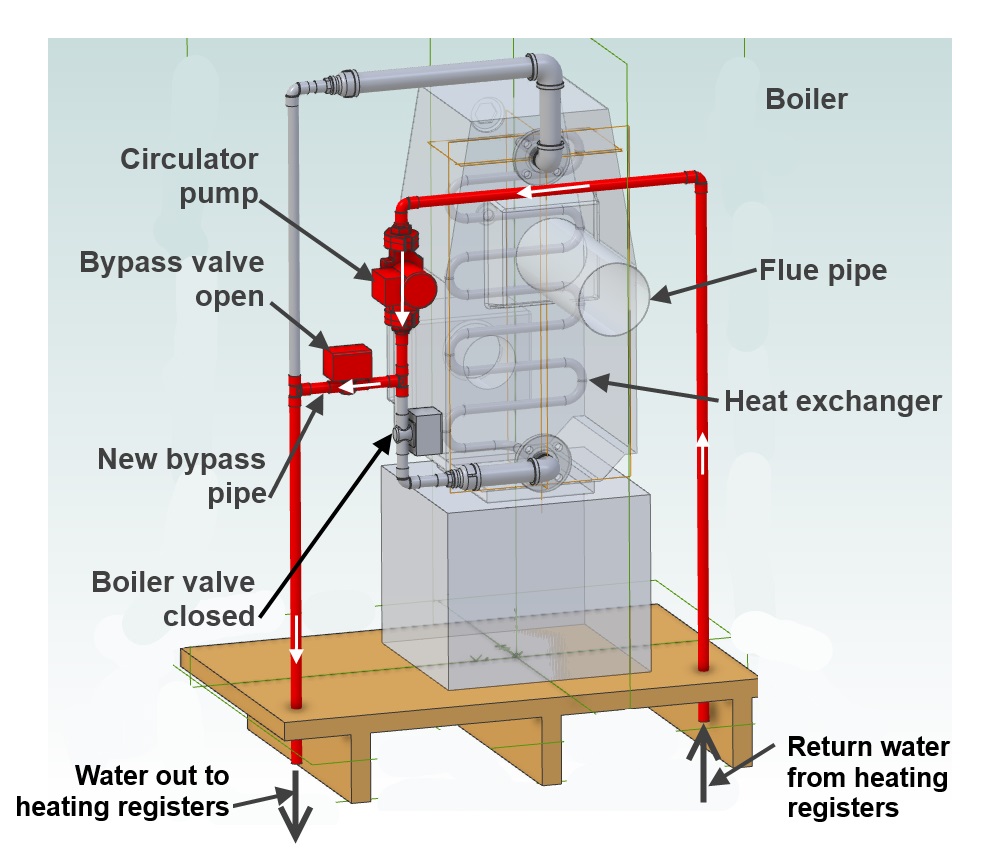
3. Opens the bypass valve and shuts the boiler valve in the plumbing. That directs the circulating water to bypass the boiler.
4. (And this is the really clever part.) Changes the function of the thermostat. The new function of the thermostat is as follows: When the fire in the stove dies down in the middle of the night, and the temperature in the room drops down to the thermostat setpoint, it reverses all four operations! It shuts off the blower, returns control of the circulator pump to the boiler control circuit, reverses the positions of the two zone valves, and reverts the operation of the thermostat itself to its normal function of controlling the room temperature.
Pressing the "Boiler" button does the same thing as operation 4 above, engaging the baseboard heating system and disengaging the stove system.
Fig. 13 shows the water flow path in Boiler Mode, the conventional way of heating a house. When the thermostat calls for heat, the circulator pump turns on, and pumps water through the boiler's heat exchanger, and then on through the heating registers in the house. Figure 14 shows the the flow path in Stove Mode. The pump runs continuously, still circulating water through the house, but bypassing the boiler, so as not to pick up any heat from it. (Just in case you're confused when trying to compare Figures 13 and 14 to Photo 12, the two figures are viewed from the rear.)
(If you'll look closely, you'll see there's also a knob on the control box. That's no longer functional. The original blower unit that came with the stove had a speed control on it. I took that controller off the discarded blower and mounted it in the box, thinking to use it to adjust the speed of the new blower. But the new blower had a much bigger motor than the old one, which drew more current than the controller was rated for. The controller soon overheated and burned out so I took it out of the circuit, and the blower runs at full speed all the time.)
I remember, after doing all the plumbing and electrical changes, I got a fire going, pressed the Stove button, and warmed up the living room. I tested the system by slowly turning up the thermostat until its setting went higher than the room temperature. That was the equivalent of the room temperature decreasing until it dropped lower than the thermostat setpoint. Sure enough, when the setting exceeded the actual room temperature, the blower shut off, and I heard the boiler start up. I went into the boiler room, and felt the output pipe feeding the heating circuit through the house. As I held it, the pipe got warm, and hot, and then too hot to hold. The heating system had kicked in as it should.
And I danced a jig.
Then I turned the thermostat back down to 68, and pressed the Stove button. The blower obediently started up again, and I watched the two zone valves switch over to their stove mode positions. Slowly, the output pipe to the house circuit began to cool off to the point where I could hold it. The water was circulating, but not going through the heat exchanger in the boiler, and therefore gradually cooling down to room temperature. It works! It works!
Grinning, I undressed, shut off the lights and went to bed. But I didn't get to sleep until about 2:00AM, when I heard the blower shut down and the boiler kick in again.
EVALUATION
All this took place more than 35 years ago. Since then, that cockamamie Rube Goldberg contraption has worked nearly flawlessly. One of my great secret pleasures now on cold winter mornings is to get out of bed, light a fire, take a long hot bath, and then jump out, and run naked and dripping to dry myself off in seconds in front of the world's biggest hand dryer. (I hope that's not too vivid an image for you. Needless to say, I live alone.)
Oh, there have been one or two failures. One of the zone valves failed, and had to be replaced. The circulator pump gasket sprung a leak and needed to be replaced. I also had to replace the blower motor a few years ago. I know that if I ever sell this house, I'll probably have to sell a service contract to the buyer. Any plumber is going to look at all those extra pipes and valves and say "WTF??!". Wisely, I've fully documented the system with wiring diagrams and plumbing diagrams, and a written description of how it works. I've bought spare valves, pumps, and gaskets, and I know where they're stashed. The few times things have gone wrong, I've had to refer to that documentation myself to figure out where the problem was. I surely don't remember the details after all this time.
The system is not perfect. There are things I would have done differently if I had it to do over.
The blower unit in the garage is WAY too powerful for the purpose. It was the smallest commercially available unit I could find, but it still blew a hot hurricane out of the stove until I almost fully closed the adjusting vanes on the intake vent in the living room floor to restrict the flow. That's a little noisy, and it uses considerably more electricity than a smaller blower would. I keep thinking that some day I might look into whether a variable transformer to lower the voltage to that unit might reduce the airflow and save electricity.
On rainy days, when the outside temperature hovers above freezing, rain water can seep between the damper valve plate and the plastic body with the intake hole for the combustion air. Then at night, if the temperature drops below freezing, the damper plate freezes to the body, and will not move. Not a big deal. That's solved by going outside and whacking the side of the plate with a wooden mallet to break it free.
There's a bit of a tricky procedure in making the transfer from Boiler Mode to Stove Mode. If the thermostat is calling for heat at the moment when I press the "Stove" button, the logic of the system says, "Ah, the room temperature has dropped below the thermostat setpoint," and it immediately reverts the system to Boiler mode. In order to get it to work, I have to lower the thermostat a couple of degrees below the current room temperature before I press the Stove button again. Then, if I forget to bring the setpoint back up once the room warms up some, I'll wake up to a chilly house the next morning.
If I had really wanted to do the job right, I would have put in three input vents, one in the bedroom, one in the office, and one in the bathroom. That way I could truly have gotten an even temperature throughout the house. I guess I could still do that if I felt ambitious. Somehow, I don't think I will.
EPILOGUE
This Blog post has been one of the more challenging ones to compose, mostly because of the images included. All the cutaway diagrams were produced with a 3-D CAD program called Alibre. In the last years of my professional career, I had worked with Solidworks, which is pretty much the industry standard for 3-D CAD software. It is enormously complex and wide-ranging in its capacities, allowing the user to model in space virtually any shaped object, and assemble those components into assemblies and mechanisms, including linkages and mechanisms that can be moved like the real thing. The learning curve on the software is extremely steep and long. I was just starting to get into the more esoteric areas of the program when I was laid off in 2011. I loved working with it. Although it was very challenging, the challenges were surmountable, and the satisfaction of creating a successful design was very gratifying. I felt as if I was being paid good money to play video games 8 hours a day. And winning the game was not only a triumph for me, but a benefit for my employer.
I really missed that challenge throughout my retirement. So last fall, I decided to buy a seat of Solidworks in order to design the parts and modifications to improve the damper valve mechanism that I detailed in my October 2019 post, Home Improvement Gone Off the Rails. I had second thoughts when I found that the software cost over $3,000 per seat with an annual maintenance charge of over a grand a year. I could afford it, but I didn't think I could justify such an outlay for what was essentially an entertaining pastime. So I shopped around for an alternative, and found Alibre. That was still over a thousand dollars, plus maintenance of a few hundred a year. The maintenance was vital for me, because it included technical advice and training. I don't think I could have learned to use the software without an expert to answer questions. Their tech service has been very competent and quick to respond.
There was a lot to learn. The approaches and techniques in Alibre are similar to those of Solidworks, but different in detail and terminology. It's been almost a decade since I used Solidworks. I've forgotten a lot, and the software has changed a lot in the intervening years. There were just a few pieces to design for the damper valve improvement last fall. But to create the cutaway of the entire system shown in Figure 8, I had to model and assemble over 50 parts. They ranged from things as simple as screws and washers, whose models I could import from the supplier, to the chimney and the stove, which I had to measure and then create in 3D space from my measurements. This was all while climbing that learning curve, down which I had slid quite a ways since I was laid off. As a challenge, I even modeled the damper crank mechanism, shown in Figures 6 and 7. In the model of the assembly, I can actually click on the handle and drag it, causing the damper to open and close in response. Now that's what I call fun. Creating that model took a week and a half of 8 to 10 hour days. I would immerse myself in it, hit roadblocks, go back and try again. If I made an error in defining the spatial relationships between one part and another, the model would literally "blow up, with parts that should be attached to each other scattered all over the universe. I had to go back and meticulously reassemble the parts one at a time from scratch until I finally figured out what had gone wrong. And then I'd look at the clock and say, "What? 9:30? No wonder I'm hungry!" It was precisely the right thing to occupy me during this period of forced isolation imposed by the COVID19 crisis.
Another time consuming activity was all those annotated photos and diagrams. That was done with a nice piece of freeware called Paint. I'm guessing it's like a Photoshop Lite. It can manipulate jpeg images, and add circles and arrows and a paragraph below each one to describe...Well, you get the idea. Fun, but not as much as Alibre.
And finally, there's the coding of the web page. I am a duffer at web design. I have a rudimentary knowledge of HTML, and I work with a very old version of Dreamweaver. Creating the tables of photographs is about as complex an operation as I can manage. Still I find it challenging and fun.
If you enjoyed reading this post half as much as I did creating it, then I enjoyed it twice as much as you.
May 6, 2020
Live Album Cover
Click on images for a full screen view.
|
|

So what can one do for entertainment while sheltering in place during the COVID-19 pandemic?
I got the above photo from a fan of mine in Maryland, Meg Pugh. She writes, "My friends and I are having a week full of recreating album covers while only using things we have in our house. We’re all stuck indoors so why have silly photo shoots? I hope you get a kick out of my recreation of The Modern Folk Musician."
There's a little more to the story of that album cover. There's something wrong with the photo on that album. Click the image and study the enlarged image carefully. Can you find what's wrong? When you give up, click here to find the answer, and the story of why it is that way.
April 23, 2020
Splitting Wood
Click on image for a full screen view.
|
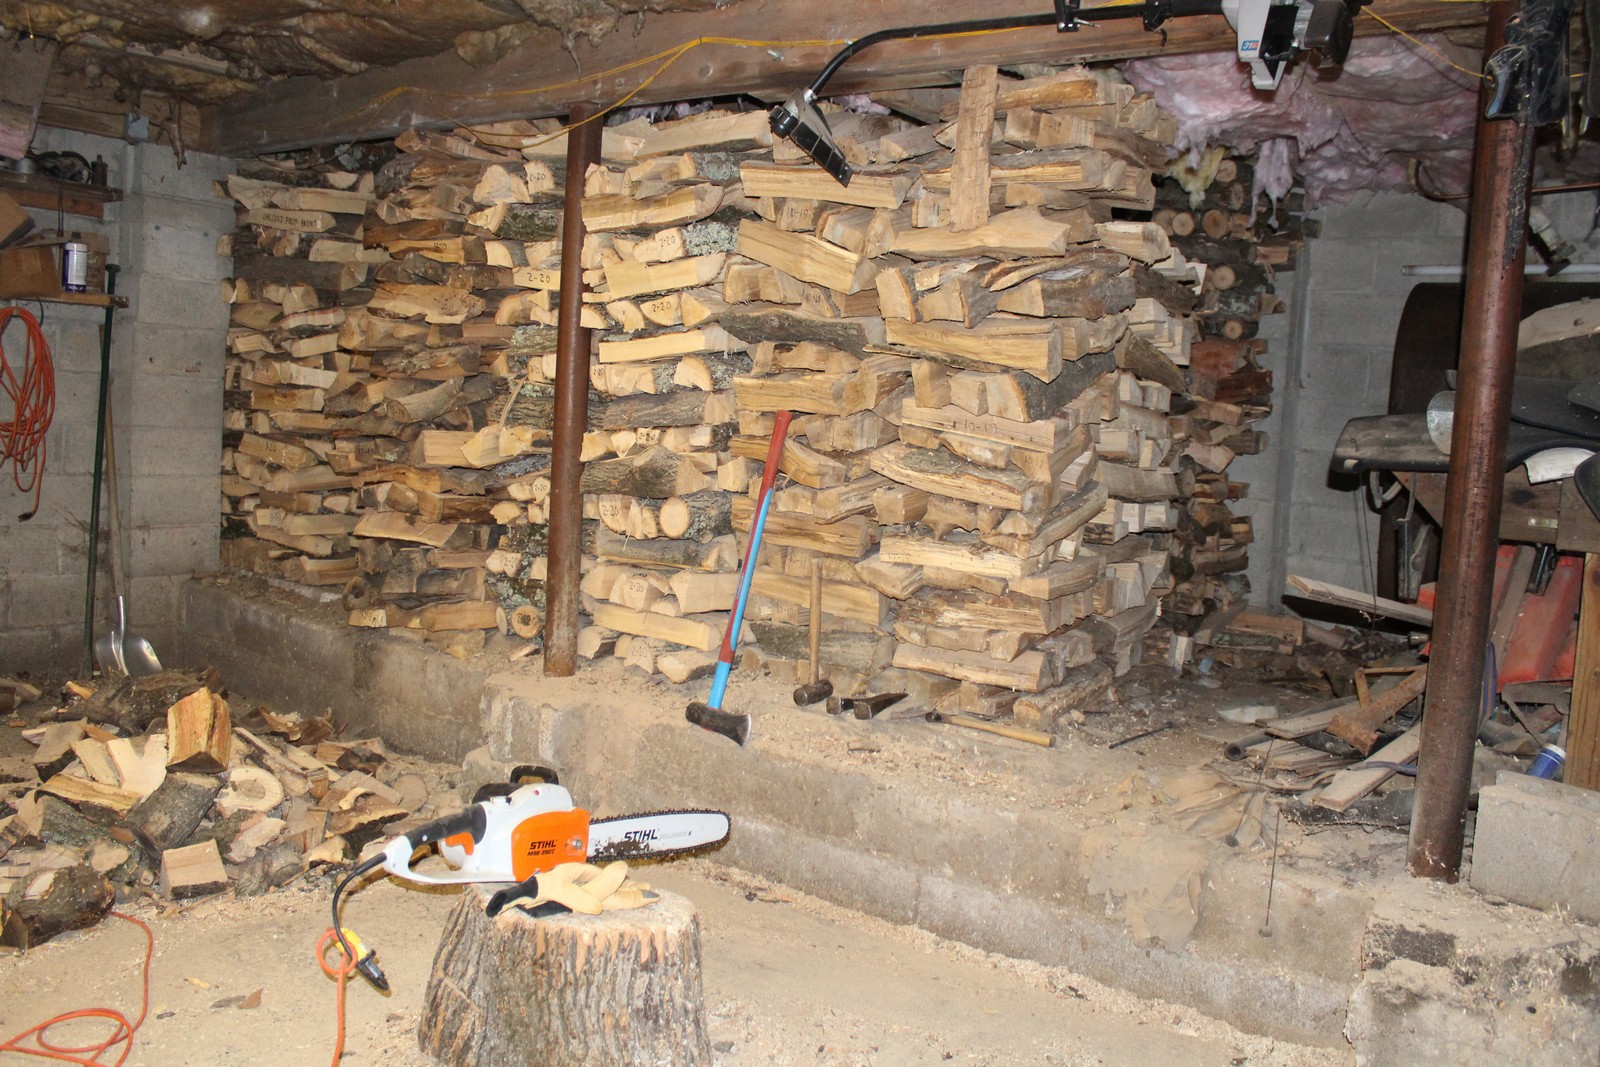
As you may know from previous blog posts (10-5-19: Home Improvement Gone Off the Rails and 7-6-17: Tree Removal), I heat with wood. I've been doing that ever since I raised my house in 1981, and installed a woodstove in the rebuilt fireplace. It was originally done with an eye towards burning less fossil fuel and saving a few bucks.
But I soon came to the realization that it was more than that. That notion solidified back in the mid 80s, when my neighbors Pete and Laurie across the street moved away to larger accommodations, and offered to give me their woodpile. It was at the height of summer, and I spent a couple of sweaty dirty hours transferring my newfound stash from their yard to my garage one wheelbarrow-load at a time. I distinctly remember pausing after dumping one load, and brushing the twigs, dirt, and bugs off my tee shirt, that there hadda be something beyond the practical about heating with wood. Something that could induce me to go through all this sweat and toil for just a few extra cozy evenings 6 or 7 months in the future.
Yes, there is something more. Something...I don't know...spiritual? A warming of the soul as well as the body by the flames on the other side of the stove's Pyrex windows. And indeed, this technological atavism has become an integral part of my way of life. I went so far as to design and install a forced hot air heating system around the stove which enables it to heat the whole house. And then devised a Rube Goldberg contraption to prevent the water of my "primary" hot water heating system from freezing in the baseboard registers adjacent to the cold outside walls on sub-zero nights when the thermostat in my cozy living room wasn't calling for heat. (See Rube Goldberg Lives in This Old House, May 26 2020.)
I buy my firewood unsplit, and then split it by hand. Again, it started out as a cost-saving plan. But I came to actually enjoy splitting wood. It's good exercise. And there's a certain sense of accomplishment watching the neat stacks accumulate. I do it in the garage below the house. My primary tool is a splitting maul (shown leaning against the stacks in the photo). It has an 8 pound head with a splitting blade on one end and a sledge at the other. When the rounds of wood to be split are bigger than 16 inches or so in diameter, I start the first cut by making a notch in the middle of the round with the blade, and then setting a cast iron wedge into the notch with a hand sledge (shown to the right of the maul). Then I whack the wedge with the sledge end of the maul head. (I'm not good enough with the maul to be able to use a second stroke to put the blade right into the notch made by the first stroke.) If I hit the wedge just right, the round splits in half, and I can break up each half into usable pieces with the blade end of the maul. There's a visceral satisfaction in hitting the wedge hard and square, driving it through, and watching the two halves separate. I also have an electric chain saw, which I can use indoors, for the difficult pieces where the grain of the wood is twisted, or there's the stub end of a big branch coming out the side of the round. I mark a few pieces in the stacks with the month and year when I split them. That tells me, when I go to bring up more wood, which stack has been has been drying longest. The small pile you see on the left of the photo contains odd-length pieces that are too short to stack. So I bring a handful of them upstairs, and add them to the main supply in the stove a few at a time. They will burn OK even when green, if they're mixed in with the strongly burning dry wood. I listen to recorded books while I work, and pass countless pleasant and mindless hours at the task, coming away feeling tired, satisfied, and virtuous.
Earlier this year, two trees came down on my street. I paid my friend Pablo to cut them into lengths and drop them off in the garage. During the past two months of "shelter in place" due to the COVID-19 pandemic, I've had lots of time to work on them. Today I just finished the last of the lot. I now have almost four cords split and stacked, which takes up just about all the storage space I have. That will probably do me for all of next winter, and on into 2021-22. There's nothing that makes a man feel wealthier than a full woodpile in April.
April 13, 2020
Dawn After the Rain
Click on image for a full screen view.
|

It rained heavily yesterday, sending the river over its banks. (Not a disaster by any means. For those newcomers to my Blog, see High Water, Ho-Hum from 2014.) It wasn't particularly high this time; just a couple of inches in the back yard, and the water didn't even reach the house. But this morning I arose just before sunrise, looked out of my bedroom window, and beheld the pink and purple dawn reflected in the still water. Grabbed my phone, and took the photo above. The photo doesn't really do the scene justice.
March 12-15
New Mexico
Click on image to go to the travelogue.
|
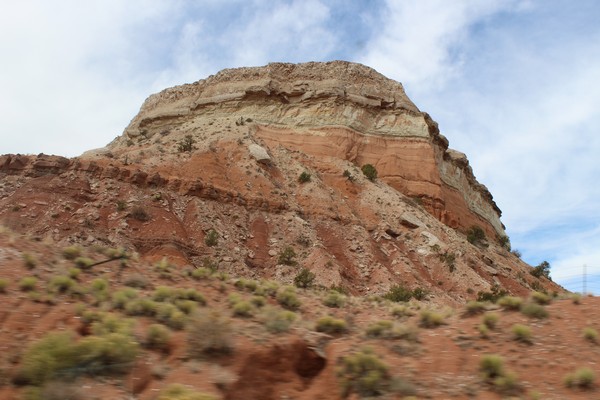
When friends Dave Levenson and Margaret Crowl retired and moved out to the Albuquerque suburb of Rio Rancho in 2019, they initiated a house concert series, and invited me out to visit and give a concert. I took them up on it, figuring to extend my stay by a couple of days, and see some of the sights. Little did I know at the time that my timing would be unfortunate. Click the photo for the story and pictures.
February 22-27
Florida Gigs and Vacation
Click on image to go to the travelogue.
|
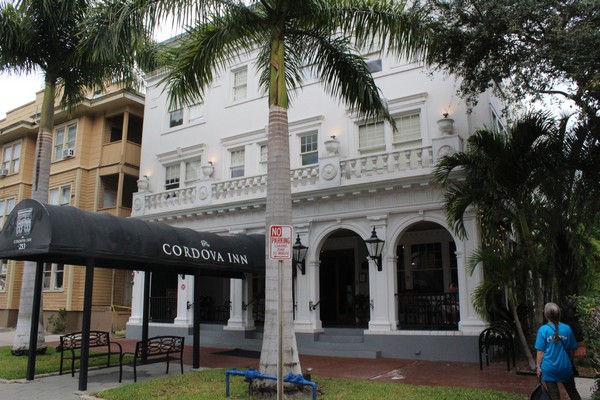
I had secured three house concerts in Gainesville, Tampa, and St. Petersburg, Florida for the weekend of February 22-23, and the following Monday. This was my first performing trip to Florida, and I was looking forward to it. And, finding myself in Florida in February, I figured it would be nice to extend my stay a few days for some sightseeing and perhaps some quality time in the sun and sand. So I called up Jenny and asked if she wanted to join me. She said yes. Click on the photo above to read the story and see the pictures.
January 5, 2020
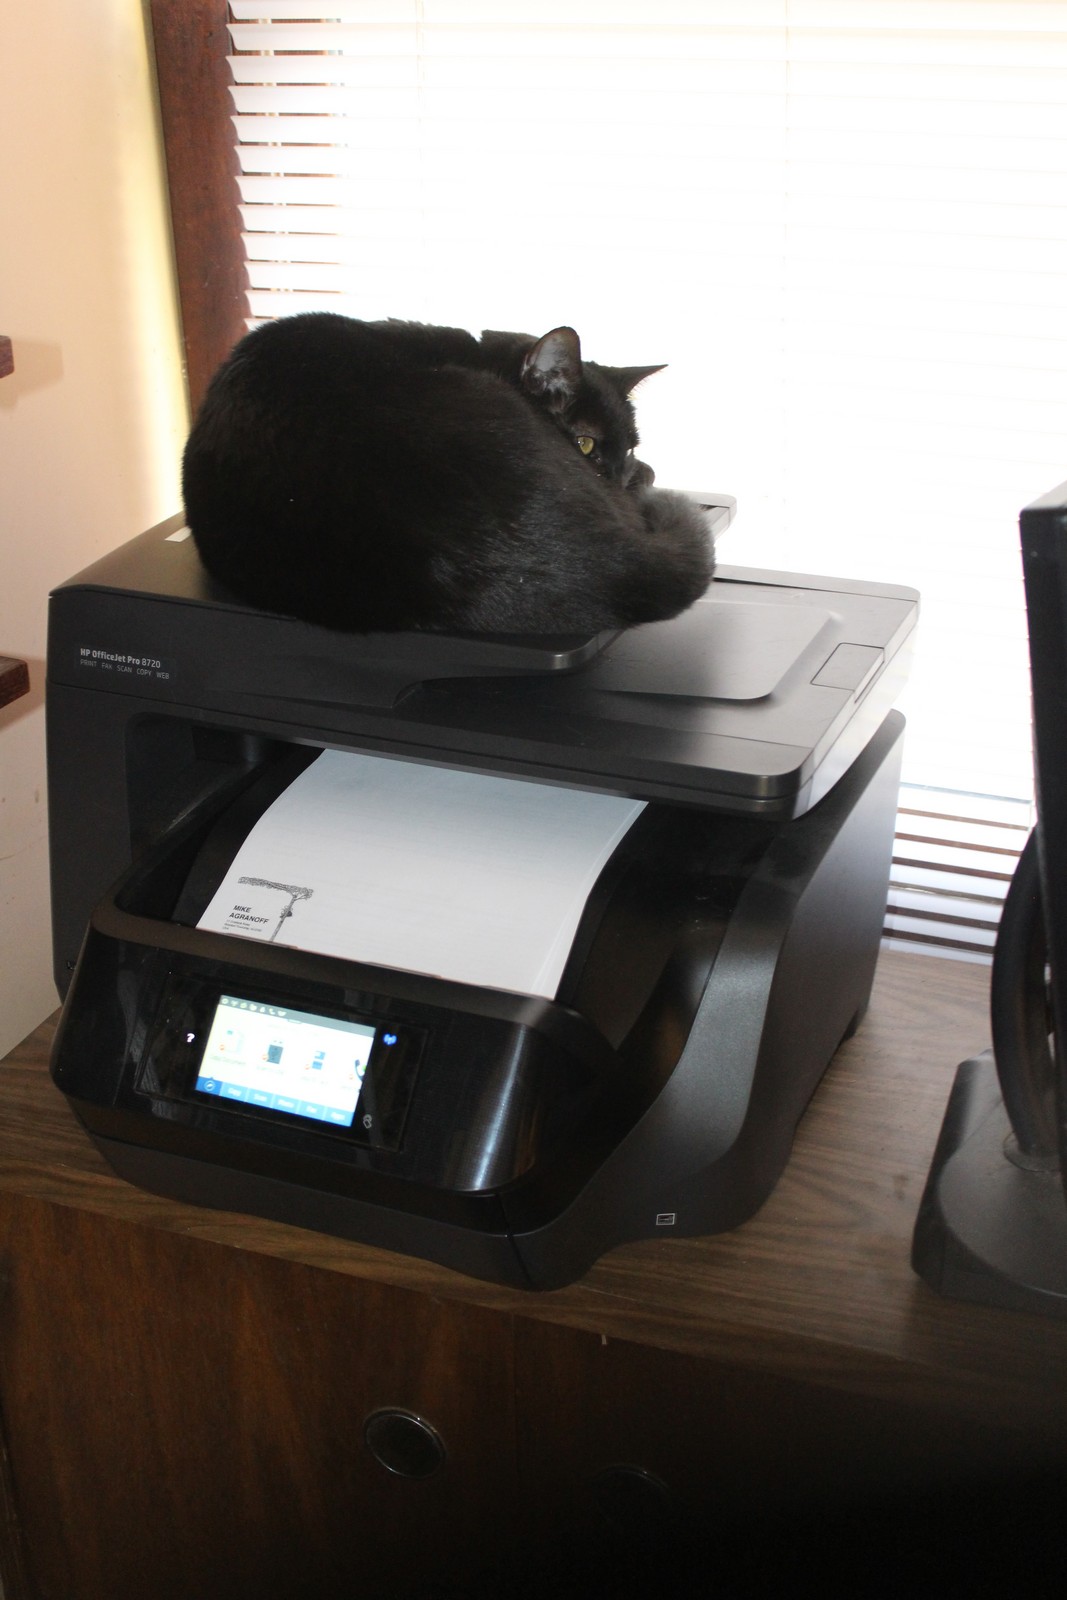
Copycat
Click on image for a full screen view.
|
No commentary required.
.